
Another week, another wave of downloadable games...
WiiWare -- Nothing here, continuing a recent trend.
DSiWare -- One new game: Chronicles of Vampires: The Awakening, which seems an odd name for the final chapter of this hidden-object game series. But there it is.
3DS eShop -- One new Virtual Console game arrives on the 3DS, starring a popular Nintendo character in one of his Game Boy titles: Kirby's Block Ball, a Breakout variant. There's also a free demo of Rayman: Origins, and something new for Nintendo, a downloadable patch for Mario Kart 7's online multiplayer eliminating several shortcut exploits.
XBox Live Arcade -- Two new titles this week: Sonic the Hedgehog 4: Episode II continues (after quite a long wait!) Sega's episodic platformer, the true sequel to the established 16-bit series. JAM Live Music Arcade is a music game that tries to bring more of a sense of true controller/guitar improvisation to the well-worn genre.
PS3 on PSN -- A whopping four new titles arrive -- Sonic the Hedgehog 4: Episode II and JAM Live Music Arcade (see above), as well as the head-to-head physics/racing/comedy contest Rock of Ages, and PixelJunk 4am, a hypnodelic music visualizer with Move controller support.
PSOne Classics -- Whether it's a classic depends on your taste in gaming, but the influential puzzle/adventure Myst arrives as a downloadable PSOne title.
Thursday, May 17, 2012


Tuesday, May 15, 2012
Adventure of the Week: Sam & Max Episode 104: Abe Lincoln Must Die! (2007)
Time marches on, and so does my self-imposed five-year spoiler threshold -- so this week, we're playing though Telltale Games' Sam & Max Episode 104 - Abe Lincoln Must Die!. This was the fourth episode of the series' first season, published in early 2007, continuing the interactive adventures of Steve Purcell's gleefully anarchic comic book canine/rabbit crime-fighting duo. The Telltale series rendered in point-and-click 3-D has been quite successful, with three seasons published to date, and the writing and puzzle construction is really hitting its stride here; there are also lots of incidental but funny conversation options available, with solid voice acting and characterization.

I always encourage interested readers to play these games for themselves, and this full episode has been made available FREE as a demo (for the season) by Telltale Games here. So you really have no excuse if you proceed from this point and wander haplessly into the brain-searing miasma of...
***** SPOILERS AHEAD! *****
The Commissioner apparently has a lot of power, as Sam & Max are out to take down the out-of-control President of the United States (after making a prank call using the organic listening device "bug" from Episode 103: The Mole, The Mob and The Meatball, which Max has used to record an exorcism.)
After a drive through the opening credits (on a blue background in this episode), our heroes find themselves outside the White House, where Agent Superball (a recurring character being introduced here) guards the entrance. Resident rat Jimmy Two-Teeth lounges in an innertube in the reflecting pool, being watched by a periscope apparently attached to a submarine; he doesn't really participate in this episode, but he was a key member of the Season 1 cast and so he puts in a cameo appearance during his vacation.
We can pick up a boxing glove at the side of the pool, and check out the pay phone in an alcove; we can't use it to make outgoing calls, as it only takes Susan B. Anthony dollars, so we'll need to go back to the office if we need to use the phone.
Our main goal at the moment is to talk our way into the White House past Agent Superball, whose wonderfully deadpan delivery has made him one of my favorite characters. There are some funny exchanges here, including one in which Superball picks up on what was meant to be a casual aside between Sam and Max concerning the difficulty of tricking him. Max would love to employ violence as a solution, but Sam's cooler head prevails. From conversation, we learn that Superball is also responsible for various secondary duties, so we probably need to distract him somehow so we can sneak in.
We can go back to the office to see what's going on in the old neighborhood. Our friend Sybil is now running a dating service, continuing her career-jumping ways. One of the newspaper headlines hanging on the wall seems to reference previous episodes: "Giant Plush Toy Suspected In Conspiracy." The closet door is locked -- and Sybil doesn't have a key for it, even though that's where she tapes video intros for her dating service. Sybil herself is having trouble finding a soulmate; she wants someone older, with a history, tall and distinguished.
Sam and Max can submit applications to see if Sybil can find dates for them; she thinks stranger things have happened... somewhere... probably. Her "computer" (which doesn't seem to actually exist beyond her rummaging around in a desk drawer) matches people's personality matrices at 15 compatibility points. And there's a great math joke here -- Max says, "I don't have a personality matrix so much as a personality vector." Of course, Sam and Max's perfect matches turn out to be... Max and Sam, respectively. And we wouldn't have it any other way.
At the dead-end street near Sybil's building, the collection of posters has been refreshed. And this time one of them falls down, so we can take it with us for potential puzzle-solving later: a military recruitment poster reading, "Give me all you got!"
The formerly-vacant storefront next to Bosco's Inconvenience Store is now occupied by Hugh Bliss, the rainbow Prismatology guru/magician encountered in Episode 102. His "Emetics" book is free, with free home delivery, and has been translated into 15,000 languages, including Esperanto. Sam is appropriately skeptical of Bliss' claims for well-being through color visualization, while Max gives in immediately to Stockholm Syndrome. We can ask Hugh Bliss to do a magic trick, and he vanishes briefly -- long enough for us to steal his "Free Home Delivery" sign. We seem to be collecting signs here.
One of the headlines on the newspaper machine outside Bosco's covers a couple of classic Lucasarts references: "Purcell attacked by Two-Headed Monkey." Bosco himself is now disguised as a Russian, apparently to dissuade a government targeting device he believes is aimed at him. He is working on his own missile defense system, and planning to raise an army of tens of millions of workers. Sam: "That's a lot of Bolsheviks." Bosco: "No! Is all true!"

Bosco has a truth serum for sale -- most likely yet another ordinary item at an outrageous price, in this case one hundred million dollars. We can also play another round of "Do you have any..." -- including souvenir snowglobes from the Mystery Vortex, a reference to the Lucasarts Sam & Max Hit the Road adventure game. Some gags in the refreshments area are recycled from previous games, saving a little episodic-development money at the expense of freshness. The restroom sports a "terror level" sign... lowest level is green, "probable terror" -- but this won't come into play in this episode.
We might as well check in at the office. The President has left some transparently self-promotional messages on the answering machine, claiming to have saved the country from a plague of robotic hyenas shortly after taking office. We can call Meesta Pizza or the White House, which should give us a chance to distract Agent Superball if we play our conversation right.
The President appears on television to announce that mandatory psychological exams will ensure that all Americans meet the minimum requirements for joy and goodwill. Our captive from episode 103, Leonard Steakcharmer, has joined the collection of past-case artifacts in the closet, still tied up and gagged. Here, too, some gags are recycled from previous episodes.
So it's time to see if we can get Superball to leave his post. "Have you checked the baby?" doesn't work -- he has -- but we can ask him to hold, and as a man of duty, he does so, indefinitely. Now we can enter the White House, to find the President putting out another crazed proclamation concerning a pudding embargo. He appears to be hypnotized, continuing this season's overarching plot, but we can't just hit him over the head as Sam & Max would usually do -- the same Secret Service agent seen at the end of 103, Agent Chuckles, is standing watch.
The office is filled with patriotic/presidential gewgaws and comic details, some tinged with political satire -- there's a sculpture of an eagle with a gun in one hand and cash in the other, for example. A portrait of George Washington on the wall appears to have Steve Purcell's face. There's a joke about Roosevelt's boxing gloves -- is that "Roosevelt" T.R. or F.D.R.? Sam thinks they belonged to E.R. And this one's my favorite milk-snorting silly elementary-school joke from this episode -- "Hi, I'm George Washington. Anyone need their nuts cracked?"

The President's character design manages to blend aspects of George W. Bush and Bill Clinton; he thinks our heroes are interpreters, and he's meeting with foreign dignitaries shortly -- a chance to intentionally mistranslate, perhaps -- but said foreigner has not yet arrived. Special Agent Chuckles can be engaged in conversation -- he's anti-critter, it seems -- and Sam recognizes his voice; he was one of the Toy Mafia bears in episode 103, but he won't admit it.
Chuckles informs us that we can't get into the tempting war room during peacetime. The President's calendar is similarly attractive, but we can't mess with it while the President is watching. If we try to enter the War Room, we are tossed out -- and witness Governor Whizzer (see Episode 101) arriving to visit the President.
Agent Superball is still on hold outside, so we can re-enter to find the Prez in need of our interpretation services -- the previous impostors who looked just like us having been thrown out -- even though Whizzer has been speaking perfect English with no accent to speak of. Whizzer is now the governor of West Dakota, America's 51st state, winning the popular vote on the strength of his erstwhile TV celebrity status as one of the Soda Poppers. He's trying to kick his own soda habit and is here to lobby the President for more federal support of his Mount Rushmore Soda Abuse Prevention Program (MRSAPP). Clearly we will want to knock him off the wagon somehow, if only for fun.
Interpreting is straightforward, but we can of course choose to distort Whizzer's words for our own purposes. There's some really great dialogue here -- most of the options are fun, as we can posit armed revolution, unrequited love, and baseball fever -- but we really want to make him ask for a drink. The President obliges, opening the Oval Office globe to reveal cold, fizzy orange sodas. Whizzer can't resist, and of course finds himself in immediate need of a bathroom. When he asks, we can translate honestly, or ask "Which way is Lincoln's Bedroom?" or "Which way is the War Room?" Getting him to attempt to access the War Room gets both him and Agent Chuckles out of the way for a bit, as they head off to the interrogation room.
Now we can try to deal with the President. Using the gun elicits Sam's comment, "I don't like Jodie Foster that much." But the boxing glove left over from a previous episode in inventory works just fine, knocking the President's head completely off and revealing him as a hypnotic puppet using the airwaves to enslave American minds. Agent Chuckles returns to discover the President is "dead," and declares an emergency election, activating the robotic statue of Abraham Lincoln, disguised as a sculpture at the Lincoln Memorial, as the presumed victor. The Commissioner calls -- it seems Max will have to run against Lincoln, and win.
We can gather some campaign slogan cue-cards from the President's office -- "The buck stops here," "1000 points of light," and "I did not have sex with that woman." But Superball has taken up guarding the War Room and the Presidential Calendar in Chuckles' place, so we can't do anything with those yet.
To win the nation's votes, Max needs to engage Lincoln in televised debate, and fortunately the robot does not match the original's statesmanship; we have an opportunity to influence Lincoln's cue-card responses with the various signs and cards we have collected to date. Our candidate can spout off some joyfully crazed, Max-like campaign speeches about his coming despotic rule, but doesn't contribute anything of substance beyond some funny moments, e.g. "We have nothing to fear but fear itself. And the chupacabra! Madre de Dios! He'll kill us all!"

We have to knock Lincoln off of his lofty perch somehow. He just keeps reading whatever is on the cue cards, so with Sam moderating the debate, we can get him to make some questionable platform policy announcements on toxic waste ("Free home delivery!"), religion and schools ("Two wrongs don't make a right!"), and taxes ("Give me all you got!") His poll standings drop with each controversial answer, though the increase actually appears to go not to Max but to perennial third-party candidate Ralph Nader.
Lincoln is still winning at 40% to Max's 39% after the cue-card takedown, so we have to probe him on family values. He has been faithful to Mary Todd Lincoln for over 150 years. Maybe we need to tempt him somehow? We can put the "I did not have sex with that woman" cue card on the stand, so it looks like we might be on the right track.
Maybe Sybil can help us find a potential date for Lincoln. Actually, maybe she would be interested. We can use the bug on Sybil to spy on her innermost thoughts, but all we hear about is other careers she is considering, which probably serves us right. There don't seem to be any blank applications around to forge, but Lincoln's campaign flyer might work as an application: "I want you!", followed by a list of his qualifications.
This episode doesn't focus as much on Bosco and Sybil as has been the case to this point -- it's more wide-ranging in scope -- but both play significant roles. Sybil loves Lincoln's "application" and asks the boys to give him her number. But Lincoln stands fast for fidelity. His prepared statement might be useful, though, if we record it with the bug and play it back for Sybil. Max teases him, eliciting a few mild threats to boot.
We can now play selectively edited portions of Lincoln's statement to Sybil over the phone, suggesting that she should meet him immediately on the steps of the White House for a date. She arrives during his family values speech, and the scandal pushes his numbers down slightly, allowing Max to win the Presidency by the narrowest of margins, much to everybody's consternation. Out of control now, the hypno-ray-eyed robotic Lincoln stomps off to wreak havoc and enslave the populace.
Sam and Max are left back on the White House lawn, and shortly President Max finds all three of the Soda Poppers -- Specs, Peepers and Whizzer -- in the Oval Office, threatening Civil War among the Dakotas they all now govern over custody of Mount Rushmore and its tourism value. And they don't quite believe Max is actually the President. They are contentious but cordial to each other; we may have to fix that.
There's a ribbon on Max's desk that we can use to appoint anybody as an honorary Cabinet member, but Peepers doesn't want it. Neither do the other Soda Poppers; Agent Superball will accept the position, but still won't stop guarding the War Room door. Using the bug confirms that Whizzer is still sorely tempted by thoughts of soda.
We can change the date on the calendar to Arbor Day, or Earth Day, or Easter, or Secr... Administrative Professionals' Day, or the Beginning of Passover. This doesn't seem to have any immediate impact, however.
We can take out after the rampaging Lincoln ("LINCOLN SMASH!") in the DeSoto, but bullets, megaphone threats and horn blasts don't distract him at all, so we need a better plan.
Perhaps we can visit Bosco and obtain his "truth serum" to give Whizzer a drink. We don't have the hundred million dollars... but maybe President Max does? Bosco recognizes Max as the President, but still wants cash on the barrelhead. Back at the White House, we can examine the Presidential Discretionary Budget, conveniently capped at one hundred million dollars. But the only available options are historic sites -- The Alamo, the Statue of Liberty, and Independence Hall.
Agent Superball will take a vacation, if it's a federal holiday. He won't take Easter or Passover off -- it has to be a secular holiday. Hmmm. We can't turn the calendar page away from April -- do we need to create a NEW federal holiday?
Sybil, disappointed by Abe's apparent dishonesty about his marital status, has changed careers again to run a... dating service? A carbon-dating service, actually, as she can't afford another signage change at the moment. Hmmmm... can we borrow her nifty carbon-dating gun? The tiki on her desk turns out to be 2000 years old -- she thinks she can get her office on the registry of historic places. Maybe those rotisserie weenies at Bosco's are old enough to qualify? Could be, but Sybil won't let us borrow the equipment until she knows her office is on the registry.
Returning to the White House, we can allocate Max's budget to her building -- and when we return there, she's nowhere in sight, presumably on debt-free vacation. The carbon-dating gun is still on her desk, and we can borrow it to confirm that Bosco's hot dogs date from the early Cretaceous period. Re-allocating the budget should be simple now. Yep -- now we get Bosco's truth serum, which as usual is rather more mundane than the price tag warrants: a bottle of vodka. Sybil is not back in her office -- we can date a few things lying around, and there's a darkly funny bit about the 8-year-old stuffed fox; Max sees the "bright side" by imagining the fox offed itself and donated its body to taxidermy.
Whizzer doesn't handle his soda very well -- so what will he do under the influence of truth-inducing vodka? He reveals that Peepers and Specs think each other's ideas are stupid, and all-out war breaks out between the Dakotas! Which cues this episode's (and season's) best and brightest surprise -- a fully-choreographed musical number celebrating the joys of War, starring a cast of multiple Agent Superballs. It's completely unexpected, witty, and charmingly animated.

Resolving not to let THAT happen again, Sam and Max enter the War Room... or would, except Superball is still guarding the door. We can strip him of his ribbon, and return it, which we need to do -- as we have appointed him Secretary of... something among the various humorous choices, say Meats and Cheeses... he is willing to abandon his duty by taking Secretary's Day off.
The Dakota Situation is getting bad, as displayed on the War Room's situation screens, and Lincoln is still on the rampage. The War Manual simply says, "1. Select Target. 2. Press Fire." This is simple enough. We can bomb Krypton (or will, eventually, in 26 million years when our missile arrives), Bosco's (he was right!), or Antarctica; the Kremlin's beacon isn't working at the moment, fortunately. The missiles are disguised as the Washington Monument; as each one launches, it is replaced with another. We can confirm that Bosco's Missile Defense System is fully operational, and shoots our incoming missile out of the air. Somehow, it appears, we need to get a targeting beacon near Lincoln.
From the War Room, we can also take a gander through the periscope in the White House pool, though we don't see anything besides Jimmy Two-Teeth lounging around. Going back to Sybil's and Bosco's doesn't yield any new ideas. Trying to chase down Lincoln again proves gun and megaphone useless in equal measure.
Hmmm. If we deallocate the budget from Bosco's store, does it disable his missile defense system? Nope. It seems we're running out of puzzles -- there's almost nobody around to talk to, and few situations to address beyond the primary challenge. And even though I had played this episode before, I got stuck here! I consulted Telltale's official walkthrough to re-discover that the homing beacon at Bosco's is on his security camera. I assumed Bosco would know or say something about it, but such is not the case. With hindsight, I should have realized the camera angle visible on the Beacon Cam was a clue to its whereabouts, and suspected it might be liberated for alternative use.
Now we can follow Lincoln in the Desoto and hopefully find a way to attach the beacon to him. A simple, accurate toss by Max does the job, and the Beacon Cam shows that it's still attached when we return to the White House (confirming that the view from the War Room is a live camera feed through each of the beacons, which I hadn't quite realized.)
In short order, Max's mighty foot strikes the red button. The missile is fired... robot Lincoln is destroyed... and Agent Chuckles, riding on the giant ex-President's shoulder, is knocked out.

And our heroes go off to do something for fun, while Chuckles' apparently robotic or alien superiors report an ominous contact error in his earpiece...
Telltale Games did adventurers' hearts good with the revival of Sam & Max, and this is arguably the best episode from season 1. But we've still got two more episodes to go before we wrap up this season, and I look forward to the ride.

I always encourage interested readers to play these games for themselves, and this full episode has been made available FREE as a demo (for the season) by Telltale Games here. So you really have no excuse if you proceed from this point and wander haplessly into the brain-searing miasma of...
***** SPOILERS AHEAD! *****
The Commissioner apparently has a lot of power, as Sam & Max are out to take down the out-of-control President of the United States (after making a prank call using the organic listening device "bug" from Episode 103: The Mole, The Mob and The Meatball, which Max has used to record an exorcism.)
After a drive through the opening credits (on a blue background in this episode), our heroes find themselves outside the White House, where Agent Superball (a recurring character being introduced here) guards the entrance. Resident rat Jimmy Two-Teeth lounges in an innertube in the reflecting pool, being watched by a periscope apparently attached to a submarine; he doesn't really participate in this episode, but he was a key member of the Season 1 cast and so he puts in a cameo appearance during his vacation.
We can pick up a boxing glove at the side of the pool, and check out the pay phone in an alcove; we can't use it to make outgoing calls, as it only takes Susan B. Anthony dollars, so we'll need to go back to the office if we need to use the phone.
Our main goal at the moment is to talk our way into the White House past Agent Superball, whose wonderfully deadpan delivery has made him one of my favorite characters. There are some funny exchanges here, including one in which Superball picks up on what was meant to be a casual aside between Sam and Max concerning the difficulty of tricking him. Max would love to employ violence as a solution, but Sam's cooler head prevails. From conversation, we learn that Superball is also responsible for various secondary duties, so we probably need to distract him somehow so we can sneak in.
We can go back to the office to see what's going on in the old neighborhood. Our friend Sybil is now running a dating service, continuing her career-jumping ways. One of the newspaper headlines hanging on the wall seems to reference previous episodes: "Giant Plush Toy Suspected In Conspiracy." The closet door is locked -- and Sybil doesn't have a key for it, even though that's where she tapes video intros for her dating service. Sybil herself is having trouble finding a soulmate; she wants someone older, with a history, tall and distinguished.
Sam and Max can submit applications to see if Sybil can find dates for them; she thinks stranger things have happened... somewhere... probably. Her "computer" (which doesn't seem to actually exist beyond her rummaging around in a desk drawer) matches people's personality matrices at 15 compatibility points. And there's a great math joke here -- Max says, "I don't have a personality matrix so much as a personality vector." Of course, Sam and Max's perfect matches turn out to be... Max and Sam, respectively. And we wouldn't have it any other way.
At the dead-end street near Sybil's building, the collection of posters has been refreshed. And this time one of them falls down, so we can take it with us for potential puzzle-solving later: a military recruitment poster reading, "Give me all you got!"
The formerly-vacant storefront next to Bosco's Inconvenience Store is now occupied by Hugh Bliss, the rainbow Prismatology guru/magician encountered in Episode 102. His "Emetics" book is free, with free home delivery, and has been translated into 15,000 languages, including Esperanto. Sam is appropriately skeptical of Bliss' claims for well-being through color visualization, while Max gives in immediately to Stockholm Syndrome. We can ask Hugh Bliss to do a magic trick, and he vanishes briefly -- long enough for us to steal his "Free Home Delivery" sign. We seem to be collecting signs here.
One of the headlines on the newspaper machine outside Bosco's covers a couple of classic Lucasarts references: "Purcell attacked by Two-Headed Monkey." Bosco himself is now disguised as a Russian, apparently to dissuade a government targeting device he believes is aimed at him. He is working on his own missile defense system, and planning to raise an army of tens of millions of workers. Sam: "That's a lot of Bolsheviks." Bosco: "No! Is all true!"

Bosco has a truth serum for sale -- most likely yet another ordinary item at an outrageous price, in this case one hundred million dollars. We can also play another round of "Do you have any..." -- including souvenir snowglobes from the Mystery Vortex, a reference to the Lucasarts Sam & Max Hit the Road adventure game. Some gags in the refreshments area are recycled from previous games, saving a little episodic-development money at the expense of freshness. The restroom sports a "terror level" sign... lowest level is green, "probable terror" -- but this won't come into play in this episode.
We might as well check in at the office. The President has left some transparently self-promotional messages on the answering machine, claiming to have saved the country from a plague of robotic hyenas shortly after taking office. We can call Meesta Pizza or the White House, which should give us a chance to distract Agent Superball if we play our conversation right.
The President appears on television to announce that mandatory psychological exams will ensure that all Americans meet the minimum requirements for joy and goodwill. Our captive from episode 103, Leonard Steakcharmer, has joined the collection of past-case artifacts in the closet, still tied up and gagged. Here, too, some gags are recycled from previous episodes.
So it's time to see if we can get Superball to leave his post. "Have you checked the baby?" doesn't work -- he has -- but we can ask him to hold, and as a man of duty, he does so, indefinitely. Now we can enter the White House, to find the President putting out another crazed proclamation concerning a pudding embargo. He appears to be hypnotized, continuing this season's overarching plot, but we can't just hit him over the head as Sam & Max would usually do -- the same Secret Service agent seen at the end of 103, Agent Chuckles, is standing watch.
The office is filled with patriotic/presidential gewgaws and comic details, some tinged with political satire -- there's a sculpture of an eagle with a gun in one hand and cash in the other, for example. A portrait of George Washington on the wall appears to have Steve Purcell's face. There's a joke about Roosevelt's boxing gloves -- is that "Roosevelt" T.R. or F.D.R.? Sam thinks they belonged to E.R. And this one's my favorite milk-snorting silly elementary-school joke from this episode -- "Hi, I'm George Washington. Anyone need their nuts cracked?"

The President's character design manages to blend aspects of George W. Bush and Bill Clinton; he thinks our heroes are interpreters, and he's meeting with foreign dignitaries shortly -- a chance to intentionally mistranslate, perhaps -- but said foreigner has not yet arrived. Special Agent Chuckles can be engaged in conversation -- he's anti-critter, it seems -- and Sam recognizes his voice; he was one of the Toy Mafia bears in episode 103, but he won't admit it.
Chuckles informs us that we can't get into the tempting war room during peacetime. The President's calendar is similarly attractive, but we can't mess with it while the President is watching. If we try to enter the War Room, we are tossed out -- and witness Governor Whizzer (see Episode 101) arriving to visit the President.
Agent Superball is still on hold outside, so we can re-enter to find the Prez in need of our interpretation services -- the previous impostors who looked just like us having been thrown out -- even though Whizzer has been speaking perfect English with no accent to speak of. Whizzer is now the governor of West Dakota, America's 51st state, winning the popular vote on the strength of his erstwhile TV celebrity status as one of the Soda Poppers. He's trying to kick his own soda habit and is here to lobby the President for more federal support of his Mount Rushmore Soda Abuse Prevention Program (MRSAPP). Clearly we will want to knock him off the wagon somehow, if only for fun.
Interpreting is straightforward, but we can of course choose to distort Whizzer's words for our own purposes. There's some really great dialogue here -- most of the options are fun, as we can posit armed revolution, unrequited love, and baseball fever -- but we really want to make him ask for a drink. The President obliges, opening the Oval Office globe to reveal cold, fizzy orange sodas. Whizzer can't resist, and of course finds himself in immediate need of a bathroom. When he asks, we can translate honestly, or ask "Which way is Lincoln's Bedroom?" or "Which way is the War Room?" Getting him to attempt to access the War Room gets both him and Agent Chuckles out of the way for a bit, as they head off to the interrogation room.
Now we can try to deal with the President. Using the gun elicits Sam's comment, "I don't like Jodie Foster that much." But the boxing glove left over from a previous episode in inventory works just fine, knocking the President's head completely off and revealing him as a hypnotic puppet using the airwaves to enslave American minds. Agent Chuckles returns to discover the President is "dead," and declares an emergency election, activating the robotic statue of Abraham Lincoln, disguised as a sculpture at the Lincoln Memorial, as the presumed victor. The Commissioner calls -- it seems Max will have to run against Lincoln, and win.
We can gather some campaign slogan cue-cards from the President's office -- "The buck stops here," "1000 points of light," and "I did not have sex with that woman." But Superball has taken up guarding the War Room and the Presidential Calendar in Chuckles' place, so we can't do anything with those yet.
To win the nation's votes, Max needs to engage Lincoln in televised debate, and fortunately the robot does not match the original's statesmanship; we have an opportunity to influence Lincoln's cue-card responses with the various signs and cards we have collected to date. Our candidate can spout off some joyfully crazed, Max-like campaign speeches about his coming despotic rule, but doesn't contribute anything of substance beyond some funny moments, e.g. "We have nothing to fear but fear itself. And the chupacabra! Madre de Dios! He'll kill us all!"

We have to knock Lincoln off of his lofty perch somehow. He just keeps reading whatever is on the cue cards, so with Sam moderating the debate, we can get him to make some questionable platform policy announcements on toxic waste ("Free home delivery!"), religion and schools ("Two wrongs don't make a right!"), and taxes ("Give me all you got!") His poll standings drop with each controversial answer, though the increase actually appears to go not to Max but to perennial third-party candidate Ralph Nader.
Lincoln is still winning at 40% to Max's 39% after the cue-card takedown, so we have to probe him on family values. He has been faithful to Mary Todd Lincoln for over 150 years. Maybe we need to tempt him somehow? We can put the "I did not have sex with that woman" cue card on the stand, so it looks like we might be on the right track.
Maybe Sybil can help us find a potential date for Lincoln. Actually, maybe she would be interested. We can use the bug on Sybil to spy on her innermost thoughts, but all we hear about is other careers she is considering, which probably serves us right. There don't seem to be any blank applications around to forge, but Lincoln's campaign flyer might work as an application: "I want you!", followed by a list of his qualifications.
This episode doesn't focus as much on Bosco and Sybil as has been the case to this point -- it's more wide-ranging in scope -- but both play significant roles. Sybil loves Lincoln's "application" and asks the boys to give him her number. But Lincoln stands fast for fidelity. His prepared statement might be useful, though, if we record it with the bug and play it back for Sybil. Max teases him, eliciting a few mild threats to boot.
We can now play selectively edited portions of Lincoln's statement to Sybil over the phone, suggesting that she should meet him immediately on the steps of the White House for a date. She arrives during his family values speech, and the scandal pushes his numbers down slightly, allowing Max to win the Presidency by the narrowest of margins, much to everybody's consternation. Out of control now, the hypno-ray-eyed robotic Lincoln stomps off to wreak havoc and enslave the populace.
Sam and Max are left back on the White House lawn, and shortly President Max finds all three of the Soda Poppers -- Specs, Peepers and Whizzer -- in the Oval Office, threatening Civil War among the Dakotas they all now govern over custody of Mount Rushmore and its tourism value. And they don't quite believe Max is actually the President. They are contentious but cordial to each other; we may have to fix that.
There's a ribbon on Max's desk that we can use to appoint anybody as an honorary Cabinet member, but Peepers doesn't want it. Neither do the other Soda Poppers; Agent Superball will accept the position, but still won't stop guarding the War Room door. Using the bug confirms that Whizzer is still sorely tempted by thoughts of soda.
We can change the date on the calendar to Arbor Day, or Earth Day, or Easter, or Secr... Administrative Professionals' Day, or the Beginning of Passover. This doesn't seem to have any immediate impact, however.
We can take out after the rampaging Lincoln ("LINCOLN SMASH!") in the DeSoto, but bullets, megaphone threats and horn blasts don't distract him at all, so we need a better plan.
Perhaps we can visit Bosco and obtain his "truth serum" to give Whizzer a drink. We don't have the hundred million dollars... but maybe President Max does? Bosco recognizes Max as the President, but still wants cash on the barrelhead. Back at the White House, we can examine the Presidential Discretionary Budget, conveniently capped at one hundred million dollars. But the only available options are historic sites -- The Alamo, the Statue of Liberty, and Independence Hall.
Agent Superball will take a vacation, if it's a federal holiday. He won't take Easter or Passover off -- it has to be a secular holiday. Hmmm. We can't turn the calendar page away from April -- do we need to create a NEW federal holiday?
Sybil, disappointed by Abe's apparent dishonesty about his marital status, has changed careers again to run a... dating service? A carbon-dating service, actually, as she can't afford another signage change at the moment. Hmmmm... can we borrow her nifty carbon-dating gun? The tiki on her desk turns out to be 2000 years old -- she thinks she can get her office on the registry of historic places. Maybe those rotisserie weenies at Bosco's are old enough to qualify? Could be, but Sybil won't let us borrow the equipment until she knows her office is on the registry.
Returning to the White House, we can allocate Max's budget to her building -- and when we return there, she's nowhere in sight, presumably on debt-free vacation. The carbon-dating gun is still on her desk, and we can borrow it to confirm that Bosco's hot dogs date from the early Cretaceous period. Re-allocating the budget should be simple now. Yep -- now we get Bosco's truth serum, which as usual is rather more mundane than the price tag warrants: a bottle of vodka. Sybil is not back in her office -- we can date a few things lying around, and there's a darkly funny bit about the 8-year-old stuffed fox; Max sees the "bright side" by imagining the fox offed itself and donated its body to taxidermy.
Whizzer doesn't handle his soda very well -- so what will he do under the influence of truth-inducing vodka? He reveals that Peepers and Specs think each other's ideas are stupid, and all-out war breaks out between the Dakotas! Which cues this episode's (and season's) best and brightest surprise -- a fully-choreographed musical number celebrating the joys of War, starring a cast of multiple Agent Superballs. It's completely unexpected, witty, and charmingly animated.

Resolving not to let THAT happen again, Sam and Max enter the War Room... or would, except Superball is still guarding the door. We can strip him of his ribbon, and return it, which we need to do -- as we have appointed him Secretary of... something among the various humorous choices, say Meats and Cheeses... he is willing to abandon his duty by taking Secretary's Day off.
The Dakota Situation is getting bad, as displayed on the War Room's situation screens, and Lincoln is still on the rampage. The War Manual simply says, "1. Select Target. 2. Press Fire." This is simple enough. We can bomb Krypton (or will, eventually, in 26 million years when our missile arrives), Bosco's (he was right!), or Antarctica; the Kremlin's beacon isn't working at the moment, fortunately. The missiles are disguised as the Washington Monument; as each one launches, it is replaced with another. We can confirm that Bosco's Missile Defense System is fully operational, and shoots our incoming missile out of the air. Somehow, it appears, we need to get a targeting beacon near Lincoln.
From the War Room, we can also take a gander through the periscope in the White House pool, though we don't see anything besides Jimmy Two-Teeth lounging around. Going back to Sybil's and Bosco's doesn't yield any new ideas. Trying to chase down Lincoln again proves gun and megaphone useless in equal measure.
Hmmm. If we deallocate the budget from Bosco's store, does it disable his missile defense system? Nope. It seems we're running out of puzzles -- there's almost nobody around to talk to, and few situations to address beyond the primary challenge. And even though I had played this episode before, I got stuck here! I consulted Telltale's official walkthrough to re-discover that the homing beacon at Bosco's is on his security camera. I assumed Bosco would know or say something about it, but such is not the case. With hindsight, I should have realized the camera angle visible on the Beacon Cam was a clue to its whereabouts, and suspected it might be liberated for alternative use.
Now we can follow Lincoln in the Desoto and hopefully find a way to attach the beacon to him. A simple, accurate toss by Max does the job, and the Beacon Cam shows that it's still attached when we return to the White House (confirming that the view from the War Room is a live camera feed through each of the beacons, which I hadn't quite realized.)
In short order, Max's mighty foot strikes the red button. The missile is fired... robot Lincoln is destroyed... and Agent Chuckles, riding on the giant ex-President's shoulder, is knocked out.

And our heroes go off to do something for fun, while Chuckles' apparently robotic or alien superiors report an ominous contact error in his earpiece...
Telltale Games did adventurers' hearts good with the revival of Sam & Max, and this is arguably the best episode from season 1. But we've still got two more episodes to go before we wrap up this season, and I look forward to the ride.
Friday, May 11, 2012
Clueless Gaijin Gaming: Mitsubachi Gakuen (1990)
One of the things I really enjoy about import gaming is its sheer unpredictability -- half the time I don't know what a game I'm buying is actually about, and even when I can't make head or tail of the story it's fun to speculate about what's going on. Some games travel well across the ocean, with minimal language barriers, while others are so specific to Japanese culture that they're almost impenetrable to Western eyes.

Hudson Soft's Mitsubachi Gakuen is a simple adventure game that falls into the latter category. It's set up like a digital comic, with simple menu-based conversation and actions, and its most striking characteristic is its heavy use of digitized photos. The PC Engine's CD-ROM technology was new and exciting, and this game pulls out all the stops -- backgrounds are shot on location, and the characters are played by actors. Bland, cheery chiptune music accompanies the visuals, freeing up the CD access for image data and keeping the story moving along at a good pace. There are even some bits of motion video during the game's intro, though these are VERY brief, consisting of just a few frames.
The story purportedly has something to do with reaching fame as a pop idol, with segments spread through the different seasons of the year, but my brief sampling of the Summer segment consisted mostly of wandering around the beach:

Chatting up girls:

Hanging around the local restaurant:

Interrupting fishermen:

And flipping through the onscreen yearbook/encyclopedia and watching the game's intro, in a vain attempt to understand who all these competing girls are (they are apparently divided into four or five teams of several girls each):

It's not much of a game, but I have to admit that its down-to-earth approach is endearing. The idol hopefuls even look like real people, instead of the idolized stereotypes that populate the PC Engine's mahjong library:

And the supporting characters are funny and sometimes comically grotesque:

Unfortunately, I ran out of patience before I made much progress in the story; my Western, non-Japanese-reading eyes were unable to make progressive choices much of the time. So this is not a game I'm ever going to finish, but it's certainly something different. Mitsubachi Gakuen marches to the beat of a very different Eastern drummer, reflecting American pop music ideals through the Japanese pop idol model of disposable stardom.
This isn't one I'm going to recommend, but I wouldn't dissuade anyone from picking it up if the above sounds appealing. You might be able to find it for sale here.

Hudson Soft's Mitsubachi Gakuen is a simple adventure game that falls into the latter category. It's set up like a digital comic, with simple menu-based conversation and actions, and its most striking characteristic is its heavy use of digitized photos. The PC Engine's CD-ROM technology was new and exciting, and this game pulls out all the stops -- backgrounds are shot on location, and the characters are played by actors. Bland, cheery chiptune music accompanies the visuals, freeing up the CD access for image data and keeping the story moving along at a good pace. There are even some bits of motion video during the game's intro, though these are VERY brief, consisting of just a few frames.
The story purportedly has something to do with reaching fame as a pop idol, with segments spread through the different seasons of the year, but my brief sampling of the Summer segment consisted mostly of wandering around the beach:
Chatting up girls:
Hanging around the local restaurant:
Interrupting fishermen:
And flipping through the onscreen yearbook/encyclopedia and watching the game's intro, in a vain attempt to understand who all these competing girls are (they are apparently divided into four or five teams of several girls each):
It's not much of a game, but I have to admit that its down-to-earth approach is endearing. The idol hopefuls even look like real people, instead of the idolized stereotypes that populate the PC Engine's mahjong library:
And the supporting characters are funny and sometimes comically grotesque:
Unfortunately, I ran out of patience before I made much progress in the story; my Western, non-Japanese-reading eyes were unable to make progressive choices much of the time. So this is not a game I'm ever going to finish, but it's certainly something different. Mitsubachi Gakuen marches to the beat of a very different Eastern drummer, reflecting American pop music ideals through the Japanese pop idol model of disposable stardom.
This isn't one I'm going to recommend, but I wouldn't dissuade anyone from picking it up if the above sounds appealing. You might be able to find it for sale here.
Thursday, May 10, 2012
The LoadDown - 05/10/2012
We're getting into the summer season, when traditional retail video game releases tend to slow down. But there are still a few interesting new titles available online...
WiiWare -- Nothing new here. Wii U coming soon?
Wii Virtual Console -- Apparently back from the dead, the Virtual Console sees two new/old Mega Drive releases on the platform, courtesy of Sega. Wonder Boy in Monster Land is the Mega Drive version of a game also known as Dragon's Curse on the TurboGrafx-16, which is already available on the VC. But Monster World IV is much more exciting -- it's the final game in the Wonder Boy series and has never been released outside of Japan; the new English translation will be appreciated by many.
DSiWare -- Two new releases here for the DSi and 3DS. Sudoku by Nikoli is for those who have exhausted all the other Sudoku options available on Nintendo's handhelds; Nikoli reportedly did much to popularize Sudoku in its early days, but given the nature of these numeric puzzles it may be hard to distinguish one designer's style from another. There's also a sequel, the unfortunately-titled Paul's Shooting Adventure 2, an inexpensive side-scrolling shooter with fun, silly enemy designs.
3DS eShop -- Nothing 3DS-specific this week; the DSi and DSi XL have price cuts coming up on May 20th so perhaps Nintendo wants to focus on delivering some value on the older hardware.
XBox Live Arcade -- A hugely successful indie game makes its way onto Microsoft's console with Minecraft: XBox 360 Edition, letting a whole new audience build and explore blocky but fascinating new worlds.
PS3 on PSN -- One new title this week: Datura, a point-and-click first-person adventure with some beautiful imagery and Move support for (in theory) better immersion.
WiiWare -- Nothing new here. Wii U coming soon?
Wii Virtual Console -- Apparently back from the dead, the Virtual Console sees two new/old Mega Drive releases on the platform, courtesy of Sega. Wonder Boy in Monster Land is the Mega Drive version of a game also known as Dragon's Curse on the TurboGrafx-16, which is already available on the VC. But Monster World IV is much more exciting -- it's the final game in the Wonder Boy series and has never been released outside of Japan; the new English translation will be appreciated by many.
DSiWare -- Two new releases here for the DSi and 3DS. Sudoku by Nikoli is for those who have exhausted all the other Sudoku options available on Nintendo's handhelds; Nikoli reportedly did much to popularize Sudoku in its early days, but given the nature of these numeric puzzles it may be hard to distinguish one designer's style from another. There's also a sequel, the unfortunately-titled Paul's Shooting Adventure 2, an inexpensive side-scrolling shooter with fun, silly enemy designs.
3DS eShop -- Nothing 3DS-specific this week; the DSi and DSi XL have price cuts coming up on May 20th so perhaps Nintendo wants to focus on delivering some value on the older hardware.
XBox Live Arcade -- A hugely successful indie game makes its way onto Microsoft's console with Minecraft: XBox 360 Edition, letting a whole new audience build and explore blocky but fascinating new worlds.
PS3 on PSN -- One new title this week: Datura, a point-and-click first-person adventure with some beautiful imagery and Move support for (in theory) better immersion.
Tuesday, May 8, 2012
Adventure of the Week: The Dalton Gang (1982)
My schedule has been a bit overcrowded lately, so for the sake of brevity I'm tackling another SoftSide adventure game for the Atari 400/800. Published in November 1982, and as usual uncredited to any specific author, SoftSide Adventure #18 -- The Dalton Gang casts the player as a newly-minted sheriff out to stop the nefarious Dalton brothers. (Incidentally, the Daltons are distant relatives on my wife's side of the family, but don't worry -- I'll still be happy to fulfill my expected role by gunning them down in the dusty streets of an unnamed town in the vintage American West.)
The disk image I found online omits the usual SoftSide intro and launches us right into the game, so we'll have to figure out the objectives on our own. Fortunately, the setup seems to speak pretty well for itself:

I always suggest that interested readers try these games out before proceeding below. Much of the fun in adventure gaming comes from discovery -- getting past an obstacle to explore a new location, coming up with the solution to a vexing problem, and figuring out what is going on in the designer's virtual world. But I also know there are literally thousands of these games out there, and they can be maddening to solve at times, so for history's sake I am trying to document my own experience of playing them. That is, I have absolutely no qualms about offering copious and (I hope) comprehensive...
***** SPOILERS AHEAD! *****
As the game begins, we find ourselves standing in front of the Sheriff's Office, currently unoccupied; a sign directs us to "APPLY AT MAYOR'S OFFICE." We can enter to find an open jail cell and a desk with a locked drawer.
Next door to the Sheriff's office, in perhaps the worst possible location for this type of business, is the town's SALOON. There are no further details provided; most of these locations are remarkably nondescript, as was usually the case with these BASIC-language adventures. The GENERAL STORE on the east side of town is closed at the moment, bearing a gag sign -- "GONE TO A HANGING, BE OUT FOR A STRETCH." There's also a LIVERY, hosting a BLACK STALLION; the Horse won't let you if we try to CLIMB STALLION, and the parser doesn't know what RIDE means.
At the NEWSPAPER OFFICE, a clerk hands us a note reading, "SEEN NEWS" -- which by adventure game logic means these are probably compass directions for navigating a maze of some kind. From the roof, up a rope ladder visible from the street, we can see the nearby BANK, but see nothing special about it.
A RAIN BARREL down the street reveals nothing special, but there's an interesting stylistic idea here -- at this location, in addition to the customary Visible Exits and Visible Items the game adds an In the distance you see category for the bank. I'm surprised more games didn't try this kind of thing -- the intrepid adventurer always seem to have tunnel vision in these early efforts.
At the eastern outskirts of town, we find ourselves walking a DUSTY TRAIL where a GOLDEN RATTLER hisses and threatens. We have nothing anti-snake in our inventory, so we'll have to go back into town to find the MAYOR'S OFFICE, which is directly west of where we start.
In the office, Mayor asks, "What do you want" (one word, please)? Apparently he is not much of a talker. Requesting a BADGE yields, "Sorry, I can't help you. Begone!", but SHERIFF produces a better response: "Ok, you'll do. Here's your first paycheck for $200. You'll get another $200 on a performance basis." Wait -- so we get half the money available just for applying, and we have to do a fair amount of work to get the other half? It sounds like the Mayor is inadvertently subsidizing drifters and encouraging a high turnover rate, but we don't seem to have any other options here so we'd best get down to business.
Travel SW of the Mayor's Office leads to a trail ending at a creek. (The screen changes background color here, as if to suggest something special; SoftSide's earlier adventure The Deadly Game adopted the same convention, but no author is credited on either.) We can GO CREEK to cross it, arriving at a green pasture at the edge of a desert. We can't walk across the desert to the east, but we can navigate the pasture as a maze; however, there are only two rooms to it, and nothing interesting to explore or find.
Maybe we need a horse to cross the desert, as the game hints: It's too far to walk on foot. So we'll go back to town and look around for a way to commandeer the Black Stallion. If we enter the Saloon now that we are armed and badged, the story kicks into gear -- Someone runs in and yells, "Sheriff, Sheriff! The bank's being robbed!"
As we approach the bank in the distance, we can see a shootout in progress, with EMMETT DALTON, BOB, BILL and GRAT participating. This seems to go on for quite a while -- at least, we have time to figure out we need to DRAW GUN... except then if we dilly-dally too long, Bill Dalton shoots us. And if we try to SHOOT BILL before he does the reverse, we tend to miss.
We can, however, GO BARREL to hide behind the rain barrel... this seems to keep us safer, but our shots keep missing. I just kept trying and while I was trying to SHOOT BILL, I did eventually hit Grat Dalton, killing him with one poorly aimed but nevertheless effective shot.
Now Bill Dalton climbs up onto the roof of the bank, as the remaining brothers continue to fire from the street in front of the bank. We can climb up the ladder on the newspaper office to the roof, where we are able to SHOOT BILL across the way. Unfortunately, while two of the Daltons are now dead, we see Emmett and Bob riding out of town, apparently with a hostage in tow. We can't GO BANK to investigate further -- for some reason we get chased out. And then the same happens at the stable, and at the general store which is now open for business. Are the townsfolk already so profoundly dissatisfied with the new Sheriff's performance? We can't even get in to see the mayor!
Hmmmm. Can we explore the Indian Reservation east of town? Trying to SHOOT RATTLER only brings out a stereotyped Native American, who says, "No shootem my pet" in terse early-80s adventurese. I'm out of bullets anyway, but clearly this is not a solution.
It seems that maybe we don't want the Daltons to show up so soon. We don't seem to have a key for the Sheriff's desk, even though now we are legitimately able to look in the drawer -- but we can SHOOT DRAWER to shoot the lock off (without damaging the contents, suggesting that the previous sheriff managed to put a padlock on a desk drawer.) Here we find a set of keys we can use to lock the jail cell, if we had to.
The parser is typical of the SoftSide games -- responses are brief and the dictionary is limited; there's no TAKE verb, only GET is supported. And DROP GUN just reholsters it, so it's no help for maze-mapping.
Starting over fresh with some knowledge in hand, I found that I was still getting chased out of all the local establishments even though the bank hadn't been robbed yet, and realized it's because I didn't HOLSTER GUN after using it. I also discovered that we can't TALK MAYOR, but if we draw our gun while in his office we get chased out.
So it's time to get back to dealing with the Daltons, now that we can visit the General Store. The store carries a typical adventure game assortment of goods -- some practical, like a canteen, boxes of ammo, a saddle, a tobacco pouch, a shovel, and food, along with more specialized items like a small ladder and a disguise (which is not described; I pictured it as a forward-looking Groucho Marx nose and glasses.) Our tab would run to $270 if we wanted to buy one of each, so we're going to have to be careful about using the $200 we currently have available to spend; the Mayor doesn't take kindly to expense reports.
The saddle is the most expensive item in the shop, at a whopping $145, but we probably need it to get anywhere, and I decided to buy some extra ammunition as well. We PUT SADDLE on the Black Stallion, and now we can CLIMB STALLION and ride him into the DRY, DUSTY, DESERTED DESERT. Navigating according to the newspaper clerk's note, we randomly encounter rattlesnakes we can shoot, but shortly it develops that You're dying of thirst. It seems that the canteen is a good investment too; we can fill it at the creek before entering the desert, and we need to drink its contents just as we reach the end of the desert, emptying the canteen.
We can explore an old mine, if we DISMOUNT, letting our horse run off. It's a maze, and the only unique room has loose floorboads. But we can't seem to GET FLOORBOARDS or GET BOARDS, and DIG FLOOR and DIG BOARD reveal nothing. If we attempt to SHOOT FLOOR, our aim is so bad that we miss completely.
Emerging from the mine, we can also visit a cabin with some bushes and a small, unclimbable tree nearby. If we DISMOUNT, the Daltons appear from the cabin. We have to DRAW GUN and probably LOAD GUN at this point, but if we wander right up to their hideout we are shot immediately. We can GO BUSHES to hide; GO CABIN is fatal. And even if we hide in the bushes just as the Daltons appear, we are discovered and shot. This appears to be because after the horse runs off, he ends up at the Daltons' cabin, arousing their suspicions.
I was a bit stuck here, so I cheated by looking at the code, where I found a reference to a CROWBAR, which ought to help with those stubbornly slippery floorboards. Looking for a possible place to find this worthwhile item, I discovered that we can GIVE FOOD to the Golden Rattler to gain access to the Indian Reservation, as the meal puts the creature to sleep. And we can buy and give the tobacco pouch to the old Indian there, who gives us a MAGIC STICK.
The magic stick doesn't appear to be anything special, and we can't WAVE STICK to summon anybody's vengeful ancestors. But later, in inventory, it becomes MAGIC STICK (POINTING DOWN) near the creek. Is it a dowsing rod? Could be, but I never actually found a practical use for it.
It's time to go back to the cabin, to see if we can figure out how to outsmart the Daltons; by this time it had occurred to me that if we are hiding in the bushes AND on the horse, then perhaps we can see them come out before they see us. This proves to be true -- if we SHOOT EMMETT they both scatter, Emmett going behind the cabin and Bob running into the mine.
A hidden trail northwest of the cabin doesn't tell us anything about where Emmett went, but we can follow it back to town, it's just a shortcut. It was worth the return trip, however, as the clerk hands us another $200 if we go into the Mayor's office; then he says, "The Mayor's been kidnapped." So is the game over??? It doesn't feel like it should be yet; apparently we have goals beyond earning a paycheck.
Backtracking yet again, I found that we can GO CABIN after scattering the Daltons to find the coveted CROWBAR. Good! Trying to find our way back to the loose floorboards in the mine, we run into Bob Dalton hiding in the mine; he shoots us before we can get there. We can take cover (automatically) but we keep missing if we try to shoot back from here, and approaching him also proves fatal. But if we wait until his six-shooter runs out of ammo (temporarily) we can go NE, see him and SHOOT BOB before he shoots us. Now that we have the crowbar, we can GET BOARD to find a SACK OF MONEY. And we are apparently such an honest lawperson that we cannot even LOOK MONEY or OPEN SACK!
We still have to deal with Emmett Dalton somehow, and find the kidnapped Mayor. If we go back to the bank, we see the last of the Daltons fleeing at a distance. We can stop at the bank and GIVE SACK to the grateful officials, but Emmett appears to be long gone.
We can reset this chain of events by coming back to the bank after leaving for a bit -- and this time I noticed that Dalton is recognizing the long arm of the law well out of its reach. It's time to buy the disguise with our recent payday, and WEAR DISGUISE. But Dalton still recognizes us and flees? Maybe we need to drop our SHERIFF'S STAR as well... yes! Now we can SHOOT EMMETT dead! But the game still isn't over -- maybe what we really want to do is ARREST EMMETT, and put him in the cell in the Sheriff's Office. (If we don't have our gun drawn when we try to do so, though, he just laughs and runs off.)
Now that I think about finding the kidnapped mayor, I realize I probably could have arrested Bob instead of shooting him earlier, so I backtracked and did so. We might as well buy the small ladder too, as we've almost cleaned out the store.
Now we can go look for the mayor. Maybe the ladder will let us climb the tree by the cabin? Nope, Ladder's not high enough. Hmmmm... it must be high enough for something, then. It doesn't work in the cabin either, there are no hidden ledges or attics available.
I was stumped again, so a more detailed peek at the code was in order. There's a room 49 we haven't visited, a pit in the mine; we apparently can reach it if we are in room 65 and MR > 0, whatever that means (I think it means the mayor has been kidnapped.) And it looks like we need the ladder to get out of the hole. Room 65 appears to be the top of a hill, another location we haven't visited. And we can CLIMB HILL outside the mine to get here -- d'oh! I just didn't explore thoroughly enough. Falling into the pit, we find the Mayor! We can climb out of a hole in the side of the pit using the ladder, and the Mayor automatically climbs out of the hole and rides with us on our horse so we can take him back to his office.
The Mayor thanks us for the rescue, and then (if our gun is still drawn) we are again chased out. And we have 8 out of 8 points, for victory! This is less than a heroic final image -- the foolish Sheriff being booted into the street after not having the good sense to put his gun away -- so it's good that we can also just LOOK to actually trigger the official end of game. Strangely, SCORE reports that we have all 8 possible points but does not actually end the game. In any case, we are victorious!

This was a more complicated little adventure than I was anticipating, and I took full advantage of peeking at the BASIC code to solve a few stumpers (perhaps a little too hastily, in this case -- I can't blame the parser as much as my own lack of exploration.) I didn't find a published walkthrough for this one, but mine should soon be up at the CASA Solution Archive, and it's included here below the fold. I'm not sure how many more SoftSide adventures were actually published -- we may be reaching the end of the series soon, but we're not there yet.
**** WALKTHROUGH ****
The disk image I found online omits the usual SoftSide intro and launches us right into the game, so we'll have to figure out the objectives on our own. Fortunately, the setup seems to speak pretty well for itself:

I always suggest that interested readers try these games out before proceeding below. Much of the fun in adventure gaming comes from discovery -- getting past an obstacle to explore a new location, coming up with the solution to a vexing problem, and figuring out what is going on in the designer's virtual world. But I also know there are literally thousands of these games out there, and they can be maddening to solve at times, so for history's sake I am trying to document my own experience of playing them. That is, I have absolutely no qualms about offering copious and (I hope) comprehensive...
***** SPOILERS AHEAD! *****
As the game begins, we find ourselves standing in front of the Sheriff's Office, currently unoccupied; a sign directs us to "APPLY AT MAYOR'S OFFICE." We can enter to find an open jail cell and a desk with a locked drawer.
Next door to the Sheriff's office, in perhaps the worst possible location for this type of business, is the town's SALOON. There are no further details provided; most of these locations are remarkably nondescript, as was usually the case with these BASIC-language adventures. The GENERAL STORE on the east side of town is closed at the moment, bearing a gag sign -- "GONE TO A HANGING, BE OUT FOR A STRETCH." There's also a LIVERY, hosting a BLACK STALLION; the Horse won't let you if we try to CLIMB STALLION, and the parser doesn't know what RIDE means.
At the NEWSPAPER OFFICE, a clerk hands us a note reading, "SEEN NEWS" -- which by adventure game logic means these are probably compass directions for navigating a maze of some kind. From the roof, up a rope ladder visible from the street, we can see the nearby BANK, but see nothing special about it.
A RAIN BARREL down the street reveals nothing special, but there's an interesting stylistic idea here -- at this location, in addition to the customary Visible Exits and Visible Items the game adds an In the distance you see category for the bank. I'm surprised more games didn't try this kind of thing -- the intrepid adventurer always seem to have tunnel vision in these early efforts.
At the eastern outskirts of town, we find ourselves walking a DUSTY TRAIL where a GOLDEN RATTLER hisses and threatens. We have nothing anti-snake in our inventory, so we'll have to go back into town to find the MAYOR'S OFFICE, which is directly west of where we start.
In the office, Mayor asks, "What do you want" (one word, please)? Apparently he is not much of a talker. Requesting a BADGE yields, "Sorry, I can't help you. Begone!", but SHERIFF produces a better response: "Ok, you'll do. Here's your first paycheck for $200. You'll get another $200 on a performance basis." Wait -- so we get half the money available just for applying, and we have to do a fair amount of work to get the other half? It sounds like the Mayor is inadvertently subsidizing drifters and encouraging a high turnover rate, but we don't seem to have any other options here so we'd best get down to business.
Travel SW of the Mayor's Office leads to a trail ending at a creek. (The screen changes background color here, as if to suggest something special; SoftSide's earlier adventure The Deadly Game adopted the same convention, but no author is credited on either.) We can GO CREEK to cross it, arriving at a green pasture at the edge of a desert. We can't walk across the desert to the east, but we can navigate the pasture as a maze; however, there are only two rooms to it, and nothing interesting to explore or find.
Maybe we need a horse to cross the desert, as the game hints: It's too far to walk on foot. So we'll go back to town and look around for a way to commandeer the Black Stallion. If we enter the Saloon now that we are armed and badged, the story kicks into gear -- Someone runs in and yells, "Sheriff, Sheriff! The bank's being robbed!"
As we approach the bank in the distance, we can see a shootout in progress, with EMMETT DALTON, BOB, BILL and GRAT participating. This seems to go on for quite a while -- at least, we have time to figure out we need to DRAW GUN... except then if we dilly-dally too long, Bill Dalton shoots us. And if we try to SHOOT BILL before he does the reverse, we tend to miss.
We can, however, GO BARREL to hide behind the rain barrel... this seems to keep us safer, but our shots keep missing. I just kept trying and while I was trying to SHOOT BILL, I did eventually hit Grat Dalton, killing him with one poorly aimed but nevertheless effective shot.
Now Bill Dalton climbs up onto the roof of the bank, as the remaining brothers continue to fire from the street in front of the bank. We can climb up the ladder on the newspaper office to the roof, where we are able to SHOOT BILL across the way. Unfortunately, while two of the Daltons are now dead, we see Emmett and Bob riding out of town, apparently with a hostage in tow. We can't GO BANK to investigate further -- for some reason we get chased out. And then the same happens at the stable, and at the general store which is now open for business. Are the townsfolk already so profoundly dissatisfied with the new Sheriff's performance? We can't even get in to see the mayor!
Hmmmm. Can we explore the Indian Reservation east of town? Trying to SHOOT RATTLER only brings out a stereotyped Native American, who says, "No shootem my pet" in terse early-80s adventurese. I'm out of bullets anyway, but clearly this is not a solution.
It seems that maybe we don't want the Daltons to show up so soon. We don't seem to have a key for the Sheriff's desk, even though now we are legitimately able to look in the drawer -- but we can SHOOT DRAWER to shoot the lock off (without damaging the contents, suggesting that the previous sheriff managed to put a padlock on a desk drawer.) Here we find a set of keys we can use to lock the jail cell, if we had to.
The parser is typical of the SoftSide games -- responses are brief and the dictionary is limited; there's no TAKE verb, only GET is supported. And DROP GUN just reholsters it, so it's no help for maze-mapping.
Starting over fresh with some knowledge in hand, I found that I was still getting chased out of all the local establishments even though the bank hadn't been robbed yet, and realized it's because I didn't HOLSTER GUN after using it. I also discovered that we can't TALK MAYOR, but if we draw our gun while in his office we get chased out.
So it's time to get back to dealing with the Daltons, now that we can visit the General Store. The store carries a typical adventure game assortment of goods -- some practical, like a canteen, boxes of ammo, a saddle, a tobacco pouch, a shovel, and food, along with more specialized items like a small ladder and a disguise (which is not described; I pictured it as a forward-looking Groucho Marx nose and glasses.) Our tab would run to $270 if we wanted to buy one of each, so we're going to have to be careful about using the $200 we currently have available to spend; the Mayor doesn't take kindly to expense reports.
The saddle is the most expensive item in the shop, at a whopping $145, but we probably need it to get anywhere, and I decided to buy some extra ammunition as well. We PUT SADDLE on the Black Stallion, and now we can CLIMB STALLION and ride him into the DRY, DUSTY, DESERTED DESERT. Navigating according to the newspaper clerk's note, we randomly encounter rattlesnakes we can shoot, but shortly it develops that You're dying of thirst. It seems that the canteen is a good investment too; we can fill it at the creek before entering the desert, and we need to drink its contents just as we reach the end of the desert, emptying the canteen.
We can explore an old mine, if we DISMOUNT, letting our horse run off. It's a maze, and the only unique room has loose floorboads. But we can't seem to GET FLOORBOARDS or GET BOARDS, and DIG FLOOR and DIG BOARD reveal nothing. If we attempt to SHOOT FLOOR, our aim is so bad that we miss completely.
Emerging from the mine, we can also visit a cabin with some bushes and a small, unclimbable tree nearby. If we DISMOUNT, the Daltons appear from the cabin. We have to DRAW GUN and probably LOAD GUN at this point, but if we wander right up to their hideout we are shot immediately. We can GO BUSHES to hide; GO CABIN is fatal. And even if we hide in the bushes just as the Daltons appear, we are discovered and shot. This appears to be because after the horse runs off, he ends up at the Daltons' cabin, arousing their suspicions.
I was a bit stuck here, so I cheated by looking at the code, where I found a reference to a CROWBAR, which ought to help with those stubbornly slippery floorboards. Looking for a possible place to find this worthwhile item, I discovered that we can GIVE FOOD to the Golden Rattler to gain access to the Indian Reservation, as the meal puts the creature to sleep. And we can buy and give the tobacco pouch to the old Indian there, who gives us a MAGIC STICK.
The magic stick doesn't appear to be anything special, and we can't WAVE STICK to summon anybody's vengeful ancestors. But later, in inventory, it becomes MAGIC STICK (POINTING DOWN) near the creek. Is it a dowsing rod? Could be, but I never actually found a practical use for it.
It's time to go back to the cabin, to see if we can figure out how to outsmart the Daltons; by this time it had occurred to me that if we are hiding in the bushes AND on the horse, then perhaps we can see them come out before they see us. This proves to be true -- if we SHOOT EMMETT they both scatter, Emmett going behind the cabin and Bob running into the mine.
A hidden trail northwest of the cabin doesn't tell us anything about where Emmett went, but we can follow it back to town, it's just a shortcut. It was worth the return trip, however, as the clerk hands us another $200 if we go into the Mayor's office; then he says, "The Mayor's been kidnapped." So is the game over??? It doesn't feel like it should be yet; apparently we have goals beyond earning a paycheck.
Backtracking yet again, I found that we can GO CABIN after scattering the Daltons to find the coveted CROWBAR. Good! Trying to find our way back to the loose floorboards in the mine, we run into Bob Dalton hiding in the mine; he shoots us before we can get there. We can take cover (automatically) but we keep missing if we try to shoot back from here, and approaching him also proves fatal. But if we wait until his six-shooter runs out of ammo (temporarily) we can go NE, see him and SHOOT BOB before he shoots us. Now that we have the crowbar, we can GET BOARD to find a SACK OF MONEY. And we are apparently such an honest lawperson that we cannot even LOOK MONEY or OPEN SACK!
We still have to deal with Emmett Dalton somehow, and find the kidnapped Mayor. If we go back to the bank, we see the last of the Daltons fleeing at a distance. We can stop at the bank and GIVE SACK to the grateful officials, but Emmett appears to be long gone.
We can reset this chain of events by coming back to the bank after leaving for a bit -- and this time I noticed that Dalton is recognizing the long arm of the law well out of its reach. It's time to buy the disguise with our recent payday, and WEAR DISGUISE. But Dalton still recognizes us and flees? Maybe we need to drop our SHERIFF'S STAR as well... yes! Now we can SHOOT EMMETT dead! But the game still isn't over -- maybe what we really want to do is ARREST EMMETT, and put him in the cell in the Sheriff's Office. (If we don't have our gun drawn when we try to do so, though, he just laughs and runs off.)
Now that I think about finding the kidnapped mayor, I realize I probably could have arrested Bob instead of shooting him earlier, so I backtracked and did so. We might as well buy the small ladder too, as we've almost cleaned out the store.
Now we can go look for the mayor. Maybe the ladder will let us climb the tree by the cabin? Nope, Ladder's not high enough. Hmmmm... it must be high enough for something, then. It doesn't work in the cabin either, there are no hidden ledges or attics available.
I was stumped again, so a more detailed peek at the code was in order. There's a room 49 we haven't visited, a pit in the mine; we apparently can reach it if we are in room 65 and MR > 0, whatever that means (I think it means the mayor has been kidnapped.) And it looks like we need the ladder to get out of the hole. Room 65 appears to be the top of a hill, another location we haven't visited. And we can CLIMB HILL outside the mine to get here -- d'oh! I just didn't explore thoroughly enough. Falling into the pit, we find the Mayor! We can climb out of a hole in the side of the pit using the ladder, and the Mayor automatically climbs out of the hole and rides with us on our horse so we can take him back to his office.
The Mayor thanks us for the rescue, and then (if our gun is still drawn) we are again chased out. And we have 8 out of 8 points, for victory! This is less than a heroic final image -- the foolish Sheriff being booted into the street after not having the good sense to put his gun away -- so it's good that we can also just LOOK to actually trigger the official end of game. Strangely, SCORE reports that we have all 8 possible points but does not actually end the game. In any case, we are victorious!

This was a more complicated little adventure than I was anticipating, and I took full advantage of peeking at the BASIC code to solve a few stumpers (perhaps a little too hastily, in this case -- I can't blame the parser as much as my own lack of exploration.) I didn't find a published walkthrough for this one, but mine should soon be up at the CASA Solution Archive, and it's included here below the fold. I'm not sure how many more SoftSide adventures were actually published -- we may be reaching the end of the series soon, but we're not there yet.
**** WALKTHROUGH ****
Thursday, May 3, 2012
The LoadDown -- 05/03/2012
May days! May days! Abandon retail!
WiiWare -- Nothing here this week, but there's a little action on the...
Wii Virtual Console -- as an emulated version of Sega's 1987 coin-op Super Hang-On arrives, with fast-paced arcade motorcycle racing that still holds up pretty well.
DSiWare -- One new title arrives for the DSi and 3DS, Amoebattle, a real-time strategy game with some honestly-come-by educational content (need energy? Absorb some mitochondria!)
3DS eShop -- One new title, Bird Mania 3D which is really a 2-D avian side-scroller with hand-painted graphics layered in 3-D. It looks like a shooter, but I don't think the player (as Mojo the... bluejay?) has any real offensive capability -- it's more of a memorization and steering challenge.
XBox Live Arcade -- Two new games this week. Fable Heroes is a multiplayer hack-and-slash side-scroller that ties into Lionhead Studios' popular Fable series. Awesomenauts is another online arena shooter.
PS3 on PSN -- Two new games. Awesomenauts shows up here also, and Doc Clock: The Toasted Sandwich of Time brings the PC adventure/platform/puzzle game to the PS3.
PSOne Classics -- Just as I was giving up on this platform, three new titles have arrived! Capcom's fighter Darkstalkers 3, Sony's stiff-upper-lip RPG The Legend of Dragoon, and EA's action mech game Future Cop: LAPD, which began life as a futuristic entry in the Strike series but developed in a different direction.
WiiWare -- Nothing here this week, but there's a little action on the...
Wii Virtual Console -- as an emulated version of Sega's 1987 coin-op Super Hang-On arrives, with fast-paced arcade motorcycle racing that still holds up pretty well.
DSiWare -- One new title arrives for the DSi and 3DS, Amoebattle, a real-time strategy game with some honestly-come-by educational content (need energy? Absorb some mitochondria!)
3DS eShop -- One new title, Bird Mania 3D which is really a 2-D avian side-scroller with hand-painted graphics layered in 3-D. It looks like a shooter, but I don't think the player (as Mojo the... bluejay?) has any real offensive capability -- it's more of a memorization and steering challenge.
XBox Live Arcade -- Two new games this week. Fable Heroes is a multiplayer hack-and-slash side-scroller that ties into Lionhead Studios' popular Fable series. Awesomenauts is another online arena shooter.
PS3 on PSN -- Two new games. Awesomenauts shows up here also, and Doc Clock: The Toasted Sandwich of Time brings the PC adventure/platform/puzzle game to the PS3.
PSOne Classics -- Just as I was giving up on this platform, three new titles have arrived! Capcom's fighter Darkstalkers 3, Sony's stiff-upper-lip RPG The Legend of Dragoon, and EA's action mech game Future Cop: LAPD, which began life as a futuristic entry in the Strike series but developed in a different direction.
Tuesday, May 1, 2012
Adventure of the Week: The Deadly Game (1982)
It's been a couple of months since I've returned to the long-running BASIC adventure game series published by SoftSide disk magazine. So this week we'll be playing SoftSide Adventure #17 -- The Deadly Game on the Atari 400/800, published in October of 1982. As is the case with most of the SoftSide games, the author is uncredited; all I can say is that this game shares some stylistic characteristics with other SoftSide text adventures.
The Deadly Game starts with a boilerplate Agatha Christie setup, as six greedy cousins gather for the reading of Uncle Henry's will. A rather lengthy text introduction takes us to Sir Henry Drysdale Vanderbilt's mansion, where we must spend the night -- a substantial inheritance will be divided among the survivors in the morning. I don't know what sort of person Uncle Henry was in life, but as a corpse he manages to come off as a sadistic jerk who desires to cause his extended family as much bloodshed as possible.

The intro is actually a bit misleading, but we'll get into the specific details later. As always, I recommend that interested readers sample this one for themselves before continuing below. This post won't try to kill you, but it no doubt contains murder, mayhem and ...
***** SPOILERS AHEAD! *****
With the intro out of the way, the maid escorts us to a guest room and locks the door, and the game launches right into the action. We see a bed, a dresser, a portrait of Uncle Henry, and an unbreakable, unopenable window, with deadly gas seeping under the door! (How exactly we observe that it is deadly gas remains a mystery; I like to imagine it forms cartoon-style clouds in the shape of a skull.) So it seems we're in an escape-the-room adventure, at least to begin with.
We can TAKE the PORTRAIT of Uncle Henry on the wall to reveal... a safe. It's already hard to breathe by the second turn. The dresser has three drawers... all of which are locked. The bed has a pillow and a blanket... and we can STUFF BLANKET - In what? - IN CRACK to stop the gas from entering. If we TAKE PILLOW, we get a nasty surprise as You have just been bitten by a tarantula hiding under your pillow. The title seems fitting, as there's certainly no shortage of ways to die in this game.
The wall safe has a combination lock. We can see a gypsy woman down below, through the unbreakable window, and apparently hear her throwing an unsubtle hint our way -- Diamonds are a girl's best friend replacing the constant PSSST of the gas heard earlier. We can also LOOK DRESSER to see that the top drawer has a bronze lock, the middle gold, and the bottom silver -- so we will probably have to find three matching keys.
The engine uses I for inventory, with no alternate INV or INVENTORY verbs, and we are constrained to a five-item inventory limit, though we aren't carrying anything at the start of the game. HELP hints that the parser is a little broader than the norm for this era, if a bit awkward -- we can LOOK UNDER - Under what? - UNDER BED to find a bronze key, though it's too far back to reach it (and the initial LOOK step isn't actually required.) We can also find a wad of gum under the chair, though it's odd that looking under the pillow does not reveal the tarantula waiting to attack.
We can't MOVE BED or take the key WITH GUM. But we can obtain the key WITH PORTRAIT (that must be why it's initially described as a LONG PORTRAIT.) We can't UNLOCK TOP, but we can just OPEN TOP now that we have the bronze key, to find a bobby pin and... a zinc key, which doesn't look like much help yet. But we can use the bobby pin to PICK LOCK and escape this first room, finding ourselves on the balcony which seems to surround the entire house.
An open door adjoining our guest room leads to the body of cousin Fred, who's already been shot. LOOK FRED reveals nothing further, and we can't SEARCH or MOVE his corpse. We may also notice that there are no other doors in these rooms, making Uncle Henry's house seem more like a Holiday Inn.
Along the south side of the balcony, we find one room that is locked, and another containing the body of cousin Phil, also shot. Whoever is doing this isn't being very original, or perhaps is saving all of his or her creative approaches for the player, as evidenced by the fact that the room's walls are caving in, moving towards us! There's a gold key in here, but it's in a far corner and we can't reach it; at least we can reset the trap by leaving the room, so this puzzle can be worked on later.
A room on the eastern side contains the body of cousin Rachael; also shot. So three of the five cousins are already dead, and the villain options are narrowing; if we had a list of our cousins, we'd almost be able to name the killer, or so it seems. The room is dark, and the light switch on the wall does nothing, so if we want to see something beyond Rachael's remains, we may need some illumination here.
Down a spiral staircase we find a massive living room, divided into nine locations. The front door to the east is locked. We find an elevator shaft on the western side, and a cellar door in the southwestern corner -- these are rather odd connections to find in the living room.
The cellar has a fuse box with two broken wires that keep falling apart if we try to reassemble them (LOOK BOX establishes all of this.) We do have to be observant, as some useful items are mentioned in the rooms descriptions and are not listed as distinct objects. There's also a garden hose, and a workbench that seems to have nothing useful on it, behind it or under it. We can mend the broken wires with... the wad of gum? This doesn't seem like it would be a good way to fix a fuse, but we can STICK GUM - On what? - ON WIRES to connect them. To go back upstairs, we can't GO STEPS as they are described onscreen, but must GO STAIRS.
We can't get back up to the balcony from the living room easily -- we encounter a live rattlesnake, and of course Snake won't let you if we try to GO STAIRS. But we are free to explore the rest of the lower level. North of the living room is a long hall with a telephone -- always busy if we try to make an outgoing call, of course -- as well as a dining room and kitchen. There's a pot on the stove with a lid -- and as we examine the kitchen, Suddenly a shadowy figure throws something sharp at you. We seem to have plenty of time to figure out what to do as the parser shrieks, "QUICK! DO SOMETHING!" We can't DUCK the incoming missile or leave the room, but we can TAKE LID as an impromptu shield, and claim the jagged rock thus deflected.
Old school adventure games sometimes have odd puzzles, and here we get to THROW HOSE at the rattlesnake, yielding the surprising response: GOOD THINKING! Snake falls in love (It looks like him too) and takes it away in some dark corner. Ahem. I'm not about to LOOK CORNER.
Now we can go to cousin Rachael's room and TURN SWITCH, turning on the lights and getting electrocuted. So why did we want to fix the fuse box?
North of our starting point, we can go to an attic upstairs, with an elevator, and visit the maid's room which contains a bed and a long broom. UNDER BED reveals nothing, but says it looks like a good hiding place so we may need to make use of it later. Taking the elevator is dangerous -- it plummets at 90 miles per hour, and we have to JUMP to survive, ending up in the living room downstairs. We actually have to take this route, however, as if we try to go back downstairs the normal way we trip and fall, fatally.
Can we use the long broom to block the crushing walls in the late cousin Phil's room? Not easily, and the parser is unforgiving -- if we try to JAM BROOM or INSERT BROOM or PUT BROOM -- On what? -- BETWEEN WALLS, we get no useful result but the walls still close in within a few turns. We can't take the gold key with the broom, either. But we can THROW BROOM (initially the parser takes this to mean THROW BRONZE if we are still carrying the bronze key!) and it automatically becomes a HORIZANTAL [sic] BROOM, preventing the walls from closing all the way.
With the gold key we can open the middle drawer in our own room and obtain a brass key. This allows us to access the room containing the corpse of cousin Marilyn, who has also been shot. A note here reads, "76L." This sounds like a combination, but my initial attempts to use suggested (incorrectly) that it's not for the wall safe.
So what next? LOOK ROCK reveals some writing, and READ ROCK reveals an inscription: 31R. So we seem to be picking up the combination in pieces. But I still couldn't figure out how to DIAL it as suggested when we try to OPEN SAFE; I tried DIAL RIGHT, DIAL 31 RIGHT, DIAL 31R, and DIAL 31R76L, which didn't get me anywhere.
Exploring some more, I realized I'd been getting tripped up a bit by the parser and was missing some key items. While we can't OPEN CABINET in the kitchen, or look behind or under it, if we simply LOOK CABINET we find an axe and some nails. We can use the axe to SMASH DOOR into the last guest room, producing a broken door and PLANKS OF WOOD. Inside the room is cousin Alex, also shot. With the saw we can SAW WOOD to... what? Ah, a step is produced. Maybe we can get back upstairs now and use that hiding space.
While checking this possibility out, I discovered a small bug here. We can LOOK STAIRS heading up to see that now A wooden step is missing. Looks dangerous! But then the game follows with the puzzling, "IN A GUEST ROOM. The door is open". This is just a minor glitch, not game-breaking.
Now it seems we should try to FIX STEP, but Sorry, you can't do that. FIX STAIRS is more informative: You can't yet. We probably need another tool, like a hammer.
I wandered into the living room at this point and ran into THE KILLER -- who shoots us. Hmmmm... we've already found the bodies of Cousin Phil, Cousin Fred, Cousin Alex, Cousin Marilyn and Cousin Rachael, which accounts for all five of them. But there's clearly an independent murder at large, contradicting the game's scenario -- the greedy cousins are not out killing each other. It doesn't seem I can get through here any more, after we have broken down the door to Alex's room, and there's no time to react:
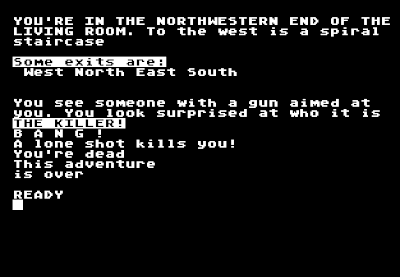
So I ended up backtracking to a previous save for better navigational freedom. Given my lesson with the kitchen cabinet, maybe i should go back to the workbench? Ack - LOOK WORKBENCH (and all the variations on that theme) reveals nothing, but LOOK BENCH turns up a can of hydrofluoric acid and a jar of turpentine, considerably more useful. The acid reportedly dissolves glass -- that's strong stuff in that can! -- and we can return to our own room to POUR ACID / ON WINDOW to dissolve it. This doesn't really do anything for us at the moment, though. The gypsy woman is still down below, still reminding us about the diamond she apparently expects us to produce. We can also POUR TURPENTINE / ON PORTRAIT, but it doesn't seem to do anything.
It seems we've explored the place pretty thoroughly, and there aren't any new puzzles pending, so it's time to see if perhaps we can survive any of the deaths we've discovered. A little a priori knowledge from a previous life lets us SMASH PILLOW / WITH ROCK -- yielding CRUNCH - You killed a tarantula under your pillow. I had to peek at the code to figure this out, though -- and also to learn that we can now use the pillow to WIPE PORTRAIT to reveal another painting, and READ PORTRAIT to get the third part of the combination, 33R.
Now we seem to have the whole combination. 33R 76L 31R (or a variation, swapping the two right turns.) But I'm still having problems getting the parser to understand what I want to do. Ah - we have to DIAL 31R76L33R, cramming it all into one "noun" to get it open. The safe contains a diamond, and it seems we should take hint and THROW it to the gypsy, who tosses us the silver key in exchange. Now we can get some gloves out of the bottom drawer, and maybe these will help us survive the electrocution in Rachael's room.
This proves to be the case -- the electrocution was built into the switch itself -- and now we can see and take a hammer, and go back to the balcony stairs to repair the step. Now we can get back up to the maid's room again, where we find a gun hidden under the bed. It contains a single bullet -- probably meant for us, and it implies the killer is either a really good shot or a really bad planner.
Leaving the maid's room, we run into Uncle Henry's lawyer, who says, "You need a permit to carry a gun." Busybody! And the game rubs it in by claiming that I don't know what 'SHOOT LAWYER' means. He won't let us past him with the gun in hand. But if we put it back and then try to go and call the police downstairs, the killer shows up and shoots us, so it seems confiscating the gun is a good idea. The lawyer disappears if we drop the gun, and reappears if we pick it up, so this constraint seems intentional.
But aha! We don't need a permit to carry a bullet, so we can disarm The Killer this way, assuming he or she doesn't have any other ammunition. I am certainly beginning to suspect the maid, what with the tarantula under the pillow and the gun hidden in her room and all of my greedy cousins dead of gunshot wounds. Not to mention her locking us in our room just before the deadly gas hits, at the very beginning of the game.
We may notice now that we still have 2 nails after repairing the step -- I wonder why, as the remaining nails never come into play.
Going back to The Killer's usual haunt, we are again confronted by this villainous figure -- but this time the empty gun clicks, and we are informed that "It's the maid! She was deemed to inherit uncle's fortune if no one survived. You grasp her and she can't escape." Funny that Uncle Henry's lawyer didn't mention this catch-all condition at the reading of the will, so we could have sent the maid away for the night on account of her clear conflict of interest.
Anyway, we are fully able to drag the captured maid all over the house. But what we should really do is go to the telephone, CALL POLICE, and take her to the front door to await processing. There's a knock, we OPEN DOOR... and apparently we are supposed to load some sort of climactic piece, but the game is bugged or expecting to load from cassette! There's no further section of code on the disk that I can see. Ah, well, I'm going to call it victory and assume whatever's left unseen here is just a quick wrapup, bundling the maid off to jail while we enjoy the much larger inheritance her machinations have afforded us. Hmmmm... maybe we shouldn't press charges. At any rate, the game ends happily if not very neatly:

In testing my solution, I discovered that The Killer does not appear as expected until we have found all of the bodies; we don't otherwise have to visit Cousin Fred's room, but the plot demands it. And the rattlesnake did not appear on my second go either, perhaps for similar reasons. The biggest issues I had with this game were parser wrestling problems, especially when discovering contents of cabinets and workbenches. But there are some tricky-for-the-wrong-reasons puzzles afoot too -- I can say with a high degree of confidence that there aren't many games where SMASH PILLOW actually does something interesting, and THROW HOSE was a bit of a stretch too. Fortunately the SoftSide games are written in BASIC, so it's not difficult to dig into the details when necessary; I like to think of it as a meta-adventure of sorts.
To save others the headaches, my walkthrough is available at the CASA solution archive, and is included here below the fold.
**** WALKTHROUGH ****
The Deadly Game starts with a boilerplate Agatha Christie setup, as six greedy cousins gather for the reading of Uncle Henry's will. A rather lengthy text introduction takes us to Sir Henry Drysdale Vanderbilt's mansion, where we must spend the night -- a substantial inheritance will be divided among the survivors in the morning. I don't know what sort of person Uncle Henry was in life, but as a corpse he manages to come off as a sadistic jerk who desires to cause his extended family as much bloodshed as possible.

The intro is actually a bit misleading, but we'll get into the specific details later. As always, I recommend that interested readers sample this one for themselves before continuing below. This post won't try to kill you, but it no doubt contains murder, mayhem and ...
***** SPOILERS AHEAD! *****
With the intro out of the way, the maid escorts us to a guest room and locks the door, and the game launches right into the action. We see a bed, a dresser, a portrait of Uncle Henry, and an unbreakable, unopenable window, with deadly gas seeping under the door! (How exactly we observe that it is deadly gas remains a mystery; I like to imagine it forms cartoon-style clouds in the shape of a skull.) So it seems we're in an escape-the-room adventure, at least to begin with.
We can TAKE the PORTRAIT of Uncle Henry on the wall to reveal... a safe. It's already hard to breathe by the second turn. The dresser has three drawers... all of which are locked. The bed has a pillow and a blanket... and we can STUFF BLANKET - In what? - IN CRACK to stop the gas from entering. If we TAKE PILLOW, we get a nasty surprise as You have just been bitten by a tarantula hiding under your pillow. The title seems fitting, as there's certainly no shortage of ways to die in this game.
The wall safe has a combination lock. We can see a gypsy woman down below, through the unbreakable window, and apparently hear her throwing an unsubtle hint our way -- Diamonds are a girl's best friend replacing the constant PSSST of the gas heard earlier. We can also LOOK DRESSER to see that the top drawer has a bronze lock, the middle gold, and the bottom silver -- so we will probably have to find three matching keys.
The engine uses I for inventory, with no alternate INV or INVENTORY verbs, and we are constrained to a five-item inventory limit, though we aren't carrying anything at the start of the game. HELP hints that the parser is a little broader than the norm for this era, if a bit awkward -- we can LOOK UNDER - Under what? - UNDER BED to find a bronze key, though it's too far back to reach it (and the initial LOOK step isn't actually required.) We can also find a wad of gum under the chair, though it's odd that looking under the pillow does not reveal the tarantula waiting to attack.
We can't MOVE BED or take the key WITH GUM. But we can obtain the key WITH PORTRAIT (that must be why it's initially described as a LONG PORTRAIT.) We can't UNLOCK TOP, but we can just OPEN TOP now that we have the bronze key, to find a bobby pin and... a zinc key, which doesn't look like much help yet. But we can use the bobby pin to PICK LOCK and escape this first room, finding ourselves on the balcony which seems to surround the entire house.
An open door adjoining our guest room leads to the body of cousin Fred, who's already been shot. LOOK FRED reveals nothing further, and we can't SEARCH or MOVE his corpse. We may also notice that there are no other doors in these rooms, making Uncle Henry's house seem more like a Holiday Inn.
Along the south side of the balcony, we find one room that is locked, and another containing the body of cousin Phil, also shot. Whoever is doing this isn't being very original, or perhaps is saving all of his or her creative approaches for the player, as evidenced by the fact that the room's walls are caving in, moving towards us! There's a gold key in here, but it's in a far corner and we can't reach it; at least we can reset the trap by leaving the room, so this puzzle can be worked on later.
A room on the eastern side contains the body of cousin Rachael; also shot. So three of the five cousins are already dead, and the villain options are narrowing; if we had a list of our cousins, we'd almost be able to name the killer, or so it seems. The room is dark, and the light switch on the wall does nothing, so if we want to see something beyond Rachael's remains, we may need some illumination here.
Down a spiral staircase we find a massive living room, divided into nine locations. The front door to the east is locked. We find an elevator shaft on the western side, and a cellar door in the southwestern corner -- these are rather odd connections to find in the living room.
The cellar has a fuse box with two broken wires that keep falling apart if we try to reassemble them (LOOK BOX establishes all of this.) We do have to be observant, as some useful items are mentioned in the rooms descriptions and are not listed as distinct objects. There's also a garden hose, and a workbench that seems to have nothing useful on it, behind it or under it. We can mend the broken wires with... the wad of gum? This doesn't seem like it would be a good way to fix a fuse, but we can STICK GUM - On what? - ON WIRES to connect them. To go back upstairs, we can't GO STEPS as they are described onscreen, but must GO STAIRS.
We can't get back up to the balcony from the living room easily -- we encounter a live rattlesnake, and of course Snake won't let you if we try to GO STAIRS. But we are free to explore the rest of the lower level. North of the living room is a long hall with a telephone -- always busy if we try to make an outgoing call, of course -- as well as a dining room and kitchen. There's a pot on the stove with a lid -- and as we examine the kitchen, Suddenly a shadowy figure throws something sharp at you. We seem to have plenty of time to figure out what to do as the parser shrieks, "QUICK! DO SOMETHING!" We can't DUCK the incoming missile or leave the room, but we can TAKE LID as an impromptu shield, and claim the jagged rock thus deflected.
Old school adventure games sometimes have odd puzzles, and here we get to THROW HOSE at the rattlesnake, yielding the surprising response: GOOD THINKING! Snake falls in love (It looks like him too) and takes it away in some dark corner. Ahem. I'm not about to LOOK CORNER.
Now we can go to cousin Rachael's room and TURN SWITCH, turning on the lights and getting electrocuted. So why did we want to fix the fuse box?
North of our starting point, we can go to an attic upstairs, with an elevator, and visit the maid's room which contains a bed and a long broom. UNDER BED reveals nothing, but says it looks like a good hiding place so we may need to make use of it later. Taking the elevator is dangerous -- it plummets at 90 miles per hour, and we have to JUMP to survive, ending up in the living room downstairs. We actually have to take this route, however, as if we try to go back downstairs the normal way we trip and fall, fatally.
Can we use the long broom to block the crushing walls in the late cousin Phil's room? Not easily, and the parser is unforgiving -- if we try to JAM BROOM or INSERT BROOM or PUT BROOM -- On what? -- BETWEEN WALLS, we get no useful result but the walls still close in within a few turns. We can't take the gold key with the broom, either. But we can THROW BROOM (initially the parser takes this to mean THROW BRONZE if we are still carrying the bronze key!) and it automatically becomes a HORIZANTAL [sic] BROOM, preventing the walls from closing all the way.
With the gold key we can open the middle drawer in our own room and obtain a brass key. This allows us to access the room containing the corpse of cousin Marilyn, who has also been shot. A note here reads, "76L." This sounds like a combination, but my initial attempts to use suggested (incorrectly) that it's not for the wall safe.
So what next? LOOK ROCK reveals some writing, and READ ROCK reveals an inscription: 31R. So we seem to be picking up the combination in pieces. But I still couldn't figure out how to DIAL it as suggested when we try to OPEN SAFE; I tried DIAL RIGHT, DIAL 31 RIGHT, DIAL 31R, and DIAL 31R76L, which didn't get me anywhere.
Exploring some more, I realized I'd been getting tripped up a bit by the parser and was missing some key items. While we can't OPEN CABINET in the kitchen, or look behind or under it, if we simply LOOK CABINET we find an axe and some nails. We can use the axe to SMASH DOOR into the last guest room, producing a broken door and PLANKS OF WOOD. Inside the room is cousin Alex, also shot. With the saw we can SAW WOOD to... what? Ah, a step is produced. Maybe we can get back upstairs now and use that hiding space.
While checking this possibility out, I discovered a small bug here. We can LOOK STAIRS heading up to see that now A wooden step is missing. Looks dangerous! But then the game follows with the puzzling, "IN A GUEST ROOM. The door is open". This is just a minor glitch, not game-breaking.
Now it seems we should try to FIX STEP, but Sorry, you can't do that. FIX STAIRS is more informative: You can't yet. We probably need another tool, like a hammer.
I wandered into the living room at this point and ran into THE KILLER -- who shoots us. Hmmmm... we've already found the bodies of Cousin Phil, Cousin Fred, Cousin Alex, Cousin Marilyn and Cousin Rachael, which accounts for all five of them. But there's clearly an independent murder at large, contradicting the game's scenario -- the greedy cousins are not out killing each other. It doesn't seem I can get through here any more, after we have broken down the door to Alex's room, and there's no time to react:

So I ended up backtracking to a previous save for better navigational freedom. Given my lesson with the kitchen cabinet, maybe i should go back to the workbench? Ack - LOOK WORKBENCH (and all the variations on that theme) reveals nothing, but LOOK BENCH turns up a can of hydrofluoric acid and a jar of turpentine, considerably more useful. The acid reportedly dissolves glass -- that's strong stuff in that can! -- and we can return to our own room to POUR ACID / ON WINDOW to dissolve it. This doesn't really do anything for us at the moment, though. The gypsy woman is still down below, still reminding us about the diamond she apparently expects us to produce. We can also POUR TURPENTINE / ON PORTRAIT, but it doesn't seem to do anything.
It seems we've explored the place pretty thoroughly, and there aren't any new puzzles pending, so it's time to see if perhaps we can survive any of the deaths we've discovered. A little a priori knowledge from a previous life lets us SMASH PILLOW / WITH ROCK -- yielding CRUNCH - You killed a tarantula under your pillow. I had to peek at the code to figure this out, though -- and also to learn that we can now use the pillow to WIPE PORTRAIT to reveal another painting, and READ PORTRAIT to get the third part of the combination, 33R.
Now we seem to have the whole combination. 33R 76L 31R (or a variation, swapping the two right turns.) But I'm still having problems getting the parser to understand what I want to do. Ah - we have to DIAL 31R76L33R, cramming it all into one "noun" to get it open. The safe contains a diamond, and it seems we should take hint and THROW it to the gypsy, who tosses us the silver key in exchange. Now we can get some gloves out of the bottom drawer, and maybe these will help us survive the electrocution in Rachael's room.
This proves to be the case -- the electrocution was built into the switch itself -- and now we can see and take a hammer, and go back to the balcony stairs to repair the step. Now we can get back up to the maid's room again, where we find a gun hidden under the bed. It contains a single bullet -- probably meant for us, and it implies the killer is either a really good shot or a really bad planner.
Leaving the maid's room, we run into Uncle Henry's lawyer, who says, "You need a permit to carry a gun." Busybody! And the game rubs it in by claiming that I don't know what 'SHOOT LAWYER' means. He won't let us past him with the gun in hand. But if we put it back and then try to go and call the police downstairs, the killer shows up and shoots us, so it seems confiscating the gun is a good idea. The lawyer disappears if we drop the gun, and reappears if we pick it up, so this constraint seems intentional.
But aha! We don't need a permit to carry a bullet, so we can disarm The Killer this way, assuming he or she doesn't have any other ammunition. I am certainly beginning to suspect the maid, what with the tarantula under the pillow and the gun hidden in her room and all of my greedy cousins dead of gunshot wounds. Not to mention her locking us in our room just before the deadly gas hits, at the very beginning of the game.
We may notice now that we still have 2 nails after repairing the step -- I wonder why, as the remaining nails never come into play.
Going back to The Killer's usual haunt, we are again confronted by this villainous figure -- but this time the empty gun clicks, and we are informed that "It's the maid! She was deemed to inherit uncle's fortune if no one survived. You grasp her and she can't escape." Funny that Uncle Henry's lawyer didn't mention this catch-all condition at the reading of the will, so we could have sent the maid away for the night on account of her clear conflict of interest.
Anyway, we are fully able to drag the captured maid all over the house. But what we should really do is go to the telephone, CALL POLICE, and take her to the front door to await processing. There's a knock, we OPEN DOOR... and apparently we are supposed to load some sort of climactic piece, but the game is bugged or expecting to load from cassette! There's no further section of code on the disk that I can see. Ah, well, I'm going to call it victory and assume whatever's left unseen here is just a quick wrapup, bundling the maid off to jail while we enjoy the much larger inheritance her machinations have afforded us. Hmmmm... maybe we shouldn't press charges. At any rate, the game ends happily if not very neatly:

In testing my solution, I discovered that The Killer does not appear as expected until we have found all of the bodies; we don't otherwise have to visit Cousin Fred's room, but the plot demands it. And the rattlesnake did not appear on my second go either, perhaps for similar reasons. The biggest issues I had with this game were parser wrestling problems, especially when discovering contents of cabinets and workbenches. But there are some tricky-for-the-wrong-reasons puzzles afoot too -- I can say with a high degree of confidence that there aren't many games where SMASH PILLOW actually does something interesting, and THROW HOSE was a bit of a stretch too. Fortunately the SoftSide games are written in BASIC, so it's not difficult to dig into the details when necessary; I like to think of it as a meta-adventure of sorts.
To save others the headaches, my walkthrough is available at the CASA solution archive, and is included here below the fold.
**** WALKTHROUGH ****
Subscribe to:
Posts (Atom)


 Posts
Posts

