Showing posts with label CoCo. Show all posts

Saturday, January 8, 2022

Adventure: 4 Mile Island Adventure (1983)

It's been a while... quite a while... nearly two years!

But I had a little free time this week to dive into a nostalgic rabbit hole, and I discovered a few adventure games for the TRS-80 Color Computer that I had seen advertised but never played back in the days when I was an avid CoCo user.  Thanks to The Color Computer Archive for keeping these vintage titles accessible!

In this post I'm going to explore 4 Mile Island Adventure, a 1983 release by Owl's Nest Software written in Extended BASIC for Color Computers with at least 16K of RAM.  The game operates entirely in memory and was originally available on tape and disk formats.  It performs pretty well for a BASIC game, in part because after some initial variable population it handles almost everything with branching logic rather than implementing a "proper" text adventure engine.  The presentation mimics the classic Scott Adams style, though it doesn't implement a real location/item "window" at the top of the screen -- text printed below will scroll it off the display like any other output text, with a new room or a LOOK restoring the top section.  Another quirk is that I is not treated as INVENTORY, we have to type at least three characters -- all single-character inputs are interpreted as directional commands.

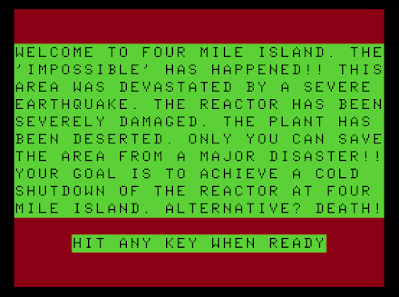
The startup screen confirms the title's implications - our goal is to stop an impending nuclear meltdown:


Can we stop it?  Maybe, but there are certain to be...


**** SPOILERS AHEAD! ****


We start out at a locked security gate, whose only purpose seems to be to suggest that we've got no way out but to deal with the problem at hand.  The map is tightly designed, consisting primarily of two long criss-crossing corridors and a few smaller sub-areas, and I didn't feel the need to draw a map to cope with this pleasantly maze-free experience.

Time is of the essence, measured in turns and temperature -- as we muddle about trying to find a solution, the reactor continues to heat up, and the game ends with a massive meltdown if we are not successful at cooling it down before it hits 750 degrees.  It took me a number of unsuccessful tries before I started to find the most efficient path, but in the classic adventure game tradition it is possible to pare  out some informational steps on subsequent attempts, and on my final run I had no problem finishing the game well before the meltdown threshold.

Exploring the office area south and east of the security gate, we find a secretary's desk, though it's called a TABLE for the sake of the parser's inability to distinguish this one from another desk to the south.  If we LOOK TABLE, we're informed THERE IS A SHEET OF PAPER.  READ PAPER yields "ENJOY THE ADVENTURE," so this is an unnecessary task and feels somehow snarky in context.

South of the secretary's desk table we find a BIG DESK (for the big boss?), and LOOK DESK reveals a drawer.  We can UNLOCK DRAWER with the key we have in our starting inventory, whether or not we know we have it, so that's not really a factor in the puzzle.  OPEN DRAWER produces a useful BADGE, gaining us access to CLASS 'B' CLEARANCE.

There's a securely-locked steel cabinet in an area down an adjoining corridor to the east, but for now we'll focus on the are north of the offices, where having the badge in our possession allows us to travel north of the 'B' SECURITY ROOM to access the REACTOR CONTROL ROOM, core of this adventure.

READ SCREEN here indicates THERE IS NOTHING WRITTEN ON IT, but that's just a parser quirk - LOOK SCREEN gives us critical status information on the state of the reactor, though at this point we don't yet know what the maximum tolerable temperature is.
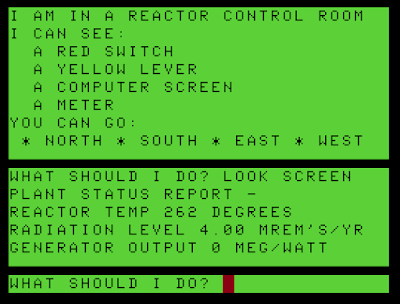

Here's where I got stuck for a bit -- I explored the facility as well as I could, learning I could reset the power breakers in the area east of the control room and observing that the generator to the west started turning after I PULLed the red SWITCH.  But I couldn't operate the yellow lever to turn on the pumps, as suggested by READ LEVER:  IT SAYS - COOLING PUMPS.

I explored the non-functional Security Station near the offices and tried various unsuccessful commands to open the steel cabinet.  Fortunately, this is a BASIC language game, and in examining the code I discovered that, while it is not mentioned onscreen or in the game's single-page manual, we are allowed to LOOK WALL, LOOK FLOOR and LOOK CEILING.  (I also discovered that the game is aware of potential player frustration and will chide the player for employing three-letter versions of several popular four-letter words!)

Armed with this new ability, I found a slot in the wall of the control room, and INSERT BADGE opened up a staircase to the lower level.  Here I found a crowbar, wrench and rod, although only the crowbar serves a useful purpose -- honestly, I like these kinds of red herrings, because they make the world seem a little more fully realized, as if another character in a different situation would have some options I just didn't need.

LOOK FLOOR in another room reveals a loose tile -- it's too heavy to pick up, but MOVE TILE produces an ID that grants CLASS 'A' CLEARANCE.  This allows us to enter the actual nuclear reactor, and while there's some spooky buzzing and a lethal-looking green glow about, the game doesn't track any game-ending cumulative radiation metrics.  So we're free to go down to the actual vat area and GET the SPANNER inconveniently stored there.  (Incidentally, I'm accustomed to seeing American text adventures with wrenches, and UK games with spanners -- this is a rare occasion where both items exist in the same story, perhaps as a means of humoring the parser.)

We've seen a few valves along the way -- three to be precise -- and armed with these tools, specifically both the crowbar and spanner, we can open the valve to the right of Security 'B' to... dump all the cooling water outside of the plant and end the game with a huge meltdown.  So that's not what we want to do.

A valve west of the control room is open and can't be closed.  But the third, east of Control, can be, and this opens the cooling valve, though not to any immediate effect.

Returning to the control room, we can PULL SWITCH once to get generator output up to 1 megawatt.  A second PULL SWITCH gets to 2 megawatts, and a third sets off an alarm and trips the breakers, which we then have to go reset.

I should pause here to note that it's possible to figure all this out by trial and error, but if we take the crowbar back to the aforementioned steel cabinet, we can PRY CABINET to reveal an OPERATIONS MANUAL, which we can OPEN and READ to learn a few technical details.  But it's not strictly necessary, as it contains no passwords or other critical puzzle-solving content.  I was fairly successful just messing around with the highly sensitive and dangerous nuclear reactor equipment, so that's a good life lesson to take away from this game.  Along with any cancer stimulus we may have picked up inside the highly insecure reactor.

Anyway, with the generator back at 1 megawatt of output (not 2, mind!) we can PULL LEVER to activate the cooling system.  A display shows the reactor temperature gradually coming down, line by line, and it's actually a pretty effective suspense technique, counting down as we cross our fingers and hope we didn't miss a puzzle somewhere along the way.  Fortunately if we have gotten to this point, victory is ours!


I enjoyed 4 Mile Island Adventure -- it only took two or three hours to complete, and it was a well-constructed little adventure game that managed to get good mileage out of a small map and a few puzzles that seemed fairly obvious but interlocked in interesting, mechanically satisfying ways.

Here's my walkthrough, should anyone want a speedy trip through the game (note that my solution here ignores a lot of discovery details, I was trying to find the most efficient route under the mistaken impression that time was a lot tighter than it really is):

S, E, E, S, S

LOOK DESK

UNLOCK DRAWER

OPEN DRAWER

GET BADGE

N, N, N, N

LOOK WALL

INSERT BADGE

D, W

DROP KEY

GET CROWBAR

E, U, S, E

LOOK FLOOR

MOVE TILE

TAKE ID

W, N, E, N, N

PUSH BREAKER

S

PUSH BREAKER

S, W, N, N

D

GET SPANNER

U, S, S, E

OPEN VALVE

W

PULL SWITCH

PULL LEVER

(And that's the end!)

Tuesday, January 13, 2015

Adventure of the Week: Dr. Avaloe (1983)

Dr. Avaloe is in the house this week, another contest winner published in The Rainbow Book of Adventures circa 1983, written by Scott Slomiany for the TRS-80 Color Computer.  The interface is unique -- it shows a schematic layout of each room, though we can't usually navigate or interact from that perspective, reverting to a normal text parser for almost all interaction.


This is one of those amateur BASIC efforts that -- like several in The Rainbow Book of Adventures -- doesn't implement a full parser or object model.  Instead, it lets us try and fail to interact with any of the objects in a given location, letting us proceed when we hit upon the right phrase.  The game's worst technical fault is that it cannot handle a short input -- trying to use I for inventory results in a fatal crash in line 1790.  The game's initialization cycle requires us not just to HIT ANY KEY, but to hold it down so there's an active input between cycles of the opening tune.

Interested readers are, of course, encouraged to play Dr. Avaloe before reading about my experience.  But I'll mention that this one is more nonsensical than most -- it's really just a sequence of puzzles, with few clues about the right course of action, no save feature, and many ways to die without warning.  I don't think I would have had the patience to finish it without diving into the source code, so you have my blessing if you simply wish to read the...

***** SPOILERS AHEAD! *****


We begin in a room with a cot, a hole, and a door.  LOOK HOLE reveals that it LOOK'S [sic] DEEP.  LOOK COT suggests that it's nailed down and unbreakable, and we can't GO HOLE.  I try to REACH HOLE, SEARCH HOLE, FEEL HOLE, LISTEN HOLE, and even explore some rather unsavory but linguistically sensible alternatives, to no avail.  LOOK FLOOR is potentially more intriguing, as it returns two responses -- NOTHING / YOU CAN'T.  Hmmmm.  That doesn't get me anywhere either, so I finally peek at the BASIC code -- it turns out that Dr. Avaloe cares little for conventional adventure game grammar, and we need to answer the WHAT DO YOU DO prompt with DOWN HOLE to leave the room.


The next room presents us with a rather unfair action challenge -- we have to navigate through the room to the door using the arrow keys, while we WATCH OUT FOR INVISIBLE CREATURES.  See the problem here?  Running into one of them ends the game, though fortunately we just have to DOWN HOLE again after restarting.


When by some feat of luck we get close to the door, we fall down a trap door into a room with two keys and some water.  The keys have writing on them, but READ KEY doesn't work.  Neither does GET KEY or GET KEYS or GET KEY1.  Hmmm.  There are deadly fish swimming about in the water, though they don't really seem to be bothering us.  And for some reason, while we can't pick the keys up, we can THROW KEY to drain the water, and now we can DOWN STAIRWAY.

We're now in a room with a carpet, a diamond, and a lever; of course, the stairway we just used vanishes as we arrive here.  Somehow, when we LOOK LEVER, we learn there are some words, but if we attempt to READ LEVER we get electrocuted.  Restarting and returning to this point, we learn that the diamond is VERY BIG and the carpet has text reading, IT'S OWND!  Must be made of that space-age n00b fiber.  I try to DOWN CARPET, and THE DIAMOND TURNS YOU INTO FLAMING DEATH!  GET DIAMOND is also fatal, as the room collapses.  DOWN DIAMOND and OWND CARPET produce similar results.  I try to PULL LEVER, and to my surprise we don't die -- instead, THE DIAMOND SPEAKS: THE CARPET!!  I try to STAND CARPET and GO CARPET, but the only acceptable solution turns out to be to SIT CARPET.  (By this time I have figured out that we can just end the game and GOTO 1060 to return to this room -- the code is written as a sequence of self-contained puzzles, rather than a map data structure with an overall game loop, so we can jump past that furshlugginer room with the invisible monsters.)

The carpet drops us off in a room with a bottle and a coin.  GET COIN causes the room to fill with molten lava -- our tormentor Dr. Avaloe seems not only sadistic, but completely random at this point.  LOOK BOTTLE reveals a piece of paper, but we can't GET or READ it.  BREAK BOTTLE works, providing a clue: 323?  LOOK COIN reveals that it looks like a button, and PRESS COIN causes a door to appear.  GO DOOR proves fatal as the walls close in.  PULL DOOR, however, lets us go into a new room.  Dang your nitpicky parser, Dr. Avaloe!

Now we face a room with A 'DEAD' BODY AND A MAGAZINE.  LOOK BODY seems to confirm that it's dead, and LOOK MAGAZINE indicates it's a SPLUNKER MAGAZINE WITH 10 PAGES (for spelunkers who tend to fall, apparently.)  Is this what that 323 clue was about?  I fail to READ PAGE 2 or even READ MAGAZINE -- oddly enough, IT WON'T BUDGE.  SEARCH BODY produces this response from the corpse: I AM DR. AVALOE'S LAST EXPERIMENT. LOOK IN MY HAND.  But when I try to LOOK HAND I am knocked out! 

Ah... this is intentional.  This is where execution gets handed over to the second part of this program -- I was wondering how the game handled retention of variables with two-part BASIC code, but the simple design ensures that it doesn't need to.  The second section of the code allows us to carry an item, but it's not a full inventory system -- when we get rid of it, it disappears, we are informed as the second part begins.

We're in a room with a cabinet, a door, and a couch.  LOOK CABINET reveals a key, and we can GET KEY.  The couch is OLD AND APPEARS COMFY, but SIT COUCH proves it to be carnivorous.  Even with the key in hand, UNLOCK DOOR indicates it won't open, and OPEN DOOR gets us electrocuted.  KICK DOOR gets us to the next room, though, in another of the bad Doctor's devilishly exacting puzzles.

We're now in a race against time, as we're being sucked up a shaft toward a spinning fan!  We have to enter a three letter word -- IT IS AN ITEM THAT YOU MIGHT HAVE.  The interface is a little unclear here -- we have to hit a key to go to the action screen, then another to acknowledge the start of this puzzle, and then finally hit the letters K, E, Y to solve the puzzle.

The next "experiment" sports a door, a button, and some armour (I think this game originated in the U.K.)  The armour appears to be our size, but we can't WEAR ARMOUR or DON ARMOUR.  READ DOOR reveals a clue -- 216, and indicates the door is unlocked.  But OPEN DOOR is a bad idea -- we are drowned in blood.  Restarting the second half of the game and getting back to this point, we learn that PUSH BUTTON causes a fully charged magnet to appear.  But GET MAGNET proves fatal as the walls close in, as does PULL MAGNET.  Oddly enough, though par for the course in Dr. Avaloe it seems, LOOK MAGNET reveals a passage.  We are prompted DO YOU GO IN IT, and answering Y gets us to the next room.

We're now in a room with a door, and all we have to do is notice that it's unlocked and OPEN DOOR.

Next up is a coffin and another door.  We can't READ or OPEN the COFFIN; LOOK DOOR indicates that it's locked... and getting hot?  SLEEP COFFIN plays a little animation of the coffin scooting out of the room, but if we fail to answer Y to the prompt, "WASN'T THAT NEAT, HUH?", the program erases itself and must be reloaded.

The coffin vanishes and we now face the titular Dr. Avaloe himself!  He gives us a clue -- 518 -- and tells us we have until the timer equals 5000 to solve the message.  He says he will come back to HEAR THE WORD, and I don't think he means we need to prepare a church service.

We're shown a screen with a rapidly counting timer, and I have no clue what to do here.  Our numeric clues seem to be 518 + 323 + 216... hmmmm.  If these translate straight to letters, they've got be in a fairly narrow range.  Either that or they're fragments of two-digit numbers.  Let's see what makes sense, structuring these to allow values between 1 and 26.  518 could be E and R.  323 could be C and W.  216 could be either U/F or B/P.  BPERCW? 

Hmmmm.  I must be missing some clues.  Digging into the code, I find that the HELP message is actually necessary.  For one thing, it gives us instructions for reading the magazine next to the dead body, and if we READ PA8, we get another clue: 405.  That suggests we're looking for two-digit numbers, as 40 wouldn't make sense but 05 would.  But nothing in our existing clues makes sense as a lead-in to the 4, either; 84, 34 and 64 are all out of range.  I don't find another numeric clue on my first pass, but I do learn that the unlikely decision to SMELL DOOR in the room after the secret passage just plain gives us the secret word: POWER.  And if we ask for HELP in this room, we get the fifth clue - 116.  Ah!  Now I see how the code works: for example, 116 tells us that character 1 is the 16th letter.  So 116, 216, 323, 405, and 518 resolve to... um... PPWER?  Oh, that crazy Dr. Avaloe!

I had no hope of doing any of this before the timer got to 5000, but fortunately, after it gets there, the game simply pauses when it prompts the player to enter the secret word!  So the time element is just a bluff.  Let's try what we've come up with... POWER... and victory is ours!!!


Dr. Avaloe never answers its premise's most interesting questions -- namely, what kind of doctor is this guy, and who on earth is funding his research?  Is there any kind of peer review involved in his experimental design?  Those details aside, this still isn't much of an adventure -- it's just a guessing game requiring a high tolerance for unpredictable death and retreading conquered territory.  But it's an interesting example of some of the experiments the genre went through in its early days, and it gets me one game closer to exhausting The Rainbow Book of Adventures.

Tuesday, November 11, 2014

Adventure of the Week: Escape From Sparta (1983)

I'm returning once again to the 1983 Rainbow Book of Adventures this week, to tackle Escape From Sparta, written by Rick Townsend and Rick Hollerback in BASIC for the TRS-80 Color Computer.  It took me a little doing to get this one running, only because the first disk image I found in the online archives contained only the instructions and loader program, and I finally figured out I needed to insert a second disk to load the game proper (ESSPARTA/BAS).  I'm playing using the VCC 1.42 CoCo emulator.


Escape From Sparta is a science-fiction tale, casting the player as a robot on a mission to rescue its Creator from an evil alien warlord bent on destroying all robots so he can take over the galaxy/universe/neighborhood/school board/whatever.  The peculiarly short-sighted Creator has imbued his robots with a novel approach to planned obsolescence -- he is the only person who can control or modify them, and they will self-destruct if anyone else tries to, say, repair them.  So we have to rescue him from Space Station Sparta, where he is being held captive.

Interested readers are encouraged to Escape From Sparta independently before proceeding with my playthrough notes below -- it's not a difficult game at all, and it does a few interesting things with the format.  Beyond this point, I'll be documenting my experience for history's sake, and there are guaranteed...

****** SPARTA SPOILERS AHEAD! *****


After the optional instructions are displayed, we find ourselves in the Security Room, with broken monitors strewn about and an enemy robot immediately attacking.  The parser requires us to hit a key to interrupt the constant attacks and enter a command; a few KILL ROBOT commands are sufficient to cause it to explode into rubble (apparently these robots are made of concrete.)  LOOK RUBBLE (EXAMINE doesn't work) discovers something called a redchip, and we now have 1 REDCHIPS and ENERGY LEFT = 750 in inventory.  So we can guess that we need to collect some number of these, without running out of energy ourselves as we take hits from enemy robots.

We can only travel up or down from our starting point, so we'll venture into the bowels of the ship first.  We find ourselves in the -- ahem -- BOTTOM ACCESS CHAMBER, with a computer console in the center of the room and exits in multiple directions.  The first door I try, the one to the west, is locked; we can INSERT REDCHIP and confirm security clearance, but the door remains locked; the card apparently only goes into the console.  But we might as well check that out while we're here -- LOOK CONSOLE establishes that the console is off, and while we can't TURN ON CONSOLE or SWITCH CONSOLE or ACTIVATE CONSOLE, we can ON CONSOLE and then type $ as prompted to use it.

This is a neat design concept -- we actually get to interact with the computer console, though it's really just the parser in disguise, as we answer the INPUT REQUEST? prompt with OPEN DOOR -- and DOORS ARE UNLOCKED.  We type X to return to the main game.

Let's head west, since the door is now open, into Tunnel #4 where we can see a brilliant star cluster out the window.  Continuing west through the tunnel, we reach the Robot Repair Room where another enemy robot is attacking and can be dispatched.  I also discover that if we hit the [ENTER] key without typing a command, we waste 10 energy units doing nothing -- and normal moves don't cost us energy at all, so I'll try to keep my keyboard fingers under control.

North of the Robot Repair Room is a lab, with lab animals and ELECTRONIC EQUIPTMENT [sic -- and a persistent typo in this game].  There's nothing we can apparently do here, so I suspect this is going to be a hunt-down-the-robots game at heart; this is odd, as the mad alien overlord we're trying to defeat is supposedly trying to destroy all the robots, and it seems like we're actually helping him by doing so.  But while I personally believe that everybody must get stunned, we don't have that option here.

East of the access chamber is Tunnel #6, with more broken EQUIPTMENT, leading to the Engineers' Quarters, where we are attacked by a human for a change.  We can easily KILL HUMAN -- there are no Asimovian restrictions in this world -- and LOOK HUMAN to discover a greenchip.  Hmmm. 

There's also a console here, but we'll go north first into the nuclear reactor room and kill another robot, collecting another redchip.  There are some levers here for controlling the nuclear reactor, but I'm not going to mess with them just yet.  South of the Engineers' Quarters is the MAINTANCE ROOM, apparently with signage provided by the same people who maintan the equiptment.  There are tools and parts here, none of which seem interesting if we LOOK at them; other than enemies and colored chips, there's not much we can interact with on this space station.

Back in the EQ, I try to ON CONSOLE but don't have security clearance until I INSERT GREENCHIP.  This console presents the same INPUT REQUEST? prompt, and I don't have anything specific to do with it just yet, though I do attempt to ask it to KILL ROBOTS for me, with no success.

Returning to the bottom access chamber, I head south through Tunnel #5 to the Computer Room, killing another human when we get here to collect another greenchip.  We can use the console here, the same way as the others, by inserting a chip and turning it on.  East of the computer room is the Sick Bay, where the beds and medical equiptment reveal nothing interesting.  The Doctor's Quarters contains yet another console, on the doc's desk, though we can't interact with this one for some reason.

Trying to head west from the Computer Room, I encounter a locked door, so we need to use the console here to open it.  This leads to a Control Room with another easy-to-murder human, and from here we can go north to the Captain Quarters, where we find THE CREATOR, the human we are here to rescue!  We have to kill a human guard, of course, and can GET SILVERCHIP after doing so.

I'm down to 290 in energy at this point, so this first run will probably be a learning experience.  But we'll try to GET CREATOR -- and this seems like a milestone, as the parser tells us O.K. YOU RESCUED THE CREATOR NOW LETS GET OUT OF HERE.   He's in no position to repair us, nor can we take a moment to berate him over his bizarre need for job security.

North of this room is the Weapon Room, but everything is smashed so we'll have to continue working with our built-in weapon.  We've explored this floor completely now, so we'll head D from the access chamber to find ourselves in the promising-sounding DOCKING BAY #2.  There's another, somewhat tougher robot to kill here, before we travel downward again to find ourselves in the even more promising ESCAPE POD #2 with a computer console handy.

This may not be a moment too soon, as we're getting ENERGY LOW! warnings now because I'm down to 100 units of energy after that last battle.  I opt to try the obvious -- we INSERT SILVERCHIP into the console and turn it on... then we access the console, and finally attempt to LAUNCH POD... to unexpected victory!


This seemed a little too straightforward -- I never even explored the upper part of the ship -- but I guess I was just lucky that my initial explorations led me straight to victory without so much as a restart.  I tried again, and confirmed that the locations of The Creator and the necessary chips are not randomized, so it's possible to finish the game in just a few minutes if you know where to go.  We do need the silverchip to use the escape pod, but since the human guarding The Creator has one, it's not like we have to go hunting for it.  On a second try, with less exploration and therefore fewer extraneous battles, I finished the game with 496 energy units to spare.

Escape from Sparta is closer in spirit to a dungeon crawl than a standard adventure -- while there's a plot of sorts, it plays more like an RPG; we spend most of our time engaging in semi-random combat, and there are no significant puzzles beyond working out how to use the computer consoles.  But I enjoyed it, simple as it is, and this brings me one game closer to exhausting The Rainbow Book of Adventures.

Tuesday, October 21, 2014

Adventure of the Week: Dungeon Adventure (1983, Steve Sherrard)

This week, we're looking at Dungeon Adventure, aka DUNGEON, written by Steve Sherrard for the TRS-80 Color Computer.  The name is admittedly generic, so much so that there was a second contest-entry game in the same 1983 Rainbow Book of Adventures collection with the same name!  The other Dungeon Adventure is an RPG I haven't been able to get running under Disk Extended Basic, but this one is a proper text adventure, with a D&D atmosphere about it.  We're supposed to be rescuing a princess, but have been thrown into the dungeon ourselves.


The engine isn't bad but it's a little buggy -- the parser has a tendency to get confused about object references with the LOOK command, and while it has a SAVE/LOAD feature, rare in these amateur efforts, and supports both disk and tape saving, the save content fails to retain some important flags.  This makes the restore operation largely useless without a little manual variable modification.

As usual, interested readers are encouraged to take a Dungeon Adventure before reading my notes below.  The game isn't difficult or lengthy, although there are a few unforeshadowed deaths and point-of-no-return challenges that required quite a few replays in my case.  At any rate, take care beyond this point, as there are certain to be...

***** SPOILERS AHEAD! *****


We begin in what seems to be a hopeless situation, in a dark pit with no obvious exits.  But INV discovers we've been left with a match and a candle, perhaps thanks to a lax security search, so we can LIGHT CANDLE and LOOK to reveal a stairway leading up.

When we GO STAIRWAY, we find ourselves in a long hall with exits to the south, east and west.  South just takes us back to the dark pit; heading east lets us pick up a sword at a turn in the hall, and there's a drunken guard at the guard post to the south, which is probably why we're free to wander around the dungeon.  We're not allowed to KILL GUARD, though, so we'll probably have to bribe him with some libation.

Heading back to the long hall and exploring to the west, we find a watch, which reveals only that TIME IS RUNNING OUT.  Continuing south through a small tunnel, we reach a round room where we find a bottle of whisky, which we'll probably want to give to the guard next time we see him.  But for now we'll continue exploring to the south, passing through a long corridor and eventually heading east into a foul-smelling room.

Venturing north into the miasma, we discover a room full of cobwebs occupied by a POISONOUS SPIDER.  Fortunately, we can easily KILL SPIDER -- and our sword crashes through the floor, revealing a cave entrance.  There's another sword here -- NOTHING SPECIAL ABOUT IT, though as the parser doesn't distinguish between the one we're carrying... oh, wait, this is our sword, which fell through the floor into the cave below.  Good to have it back, then.  Sometimes text isn't quite as clear as an illustration would be.

We can explore the cave to the east or west... a musty room to the east contains nothing interesting, though it leads south into a supply room with a hammer and exits to the east and west.  We have a five-item inventory limit, so I'll leave the hammer here for now.

East of the supply room is a jagged corridor that travels south into a low passage, with exits west and further south again.  To the south is a store room containing some rusty nails, probably for use with the hammer.  West is the EDGE OF A SMALL HOLE, leading down.  Should we go down there?  Might as well -- the hole contains a ladder, which we can take with us; we can climb U out of the hole without using the ladder, it seems.

Returning to the supply room, we explore to the west to find a descending passage heading south again, leading to a dead end where we can pick up a rope.  (This adventure's item list is nothing if not generic, so far!)

Backtracking to the cave entrance underneath the late spider's den, we explore west from this point to discover a large stone room with further exits south and west.  To the west we find the edge of a pit, and we'll postpone going down there for the moment.  South is a curving passage containing AN ISSUE OF RAINBOW MAGAZINE, and we can LOOK MAGAZINE to find "A REVIEW FOR DUNGEON BY STEVE SHERRARD."  Apparently this was meant as a commercial title at some point?  The reviewer seems filled with enthusiasm, sarcasm, or both: "I LOVE DIGGING HOLES IN DUNGEONS."   Probably a hint.

We'll continue south and west to AN OLD FOOD STORAGE ROOM where we can acquire a mousetrap.  We have to refer to it as a TRAP, not a MOUSETRAP, so we can LOOK TRAP to see an inscription: NEVER-MISS CO.

The dungeon isn't too hard to map out, as many pathways lead to a dead end with just a few forks in the path along the way.  The only direction we haven't checked out down in the cave at this point is the pit, but I'll bring the rope and the ladder along just in case we can't climb out.  We find a shovel in the pit, very handy, and we can test it out by trying to DIG HOLE here, though we don't find anything.

How do we get out of the pit, then?  I brought the ladder, but when I try to drop it and CLIMB LADDER, I HAVE NOTHING TO CLIMB.  Hmmmm.  LOOK LADDER indicates it sports writing reading "4.U.2. CLIMB," but this seems to be false advertising.  Ahhhh... we have to have the ladder in inventory in order to CLIMB LADDER.  This is not the way these devices usually work, but we're out of the pit at least, apparently using some sort of awkward pole vault maneuver to launch ourselves out of its depths while carrying the ladder.

I suspect we're going to need to DIG HOLE in the right place to make much further progress, so I'll spend a little time exploring and digging holes throughout the dungeon map now that we've covered the obvious ground.  But I don't find anything.  Hmmmm.

I guess it's time to GIVE WHISKY to the guard and see where that gets us.  His departure reveals a small passage, and we see a sharp knife here -- though if we try to GET KNIFE, we cut ourselves and bleed to death before we can take any sort of action to stop this from happening.  So we'll leave it alone on our next life.

Continuing past the GinsuKiri knife, we find ourselves in a jail cell with A CAVED IN HOLE.  DIG HOLE here clears the blockage, and we can enter a tight tunnel if we drop some items that are too large to fit through.  Unfortunately, it seems I should not have dropped the shovel, as the passage caves in behind us once we pass through it.

I might as well continue exploring for a bit before giving up, and I soon discover that our candle can burn out, leaving us in the dark where one wrong step is likely to mean death -- and even stopping to try to take INVentory leads to an accident of precisely this sort, so once the candle is out, we're pretty much done.

On my third life, I SAVE before entering the hole in the jail cell - the game conveniently supports either tape or disk saving -- and discover that the shovel is the thing that won't fit through the tight tunnel.  So we'll have to deal with the cave-in some other way, or simply accept there will be no turning back.

With only the candle in hand, because I don't know what else we might have needed to bring to this point, I explore south of the new cave-in to find a dead end with a lantern and a locked door.  The lantern might last longer than the candle, but of course I've left the matches behind as well, so we'll just have to go until our light source burns out (LIGHT LANTERN yields YOU CAN'T DO THAT YET, so the burning candle is apparently incapable of igniting the lantern.)

We can walk past the cave-in to the north, through a small hall to... a point where the candle again burns out completely, and again I die on the next move even if I stand stock still!  Apparently if we don't have the lantern at this specific location, we're simply doomed regardless of the number of turns we've gone through.  Perhaps there's a bad draft here.

Anyway, we'll LOAD and try again... except it turns out there's a bug of some kind afoot, because while I can still see the CAVE ENTRANCE and the STONE STAIRWAY, I am unable to GO to or through either one of them after a restore.  So I guess this feature doesn't quite work as advertised, and we'll have to start over from scratch anyway.

This time, I go into the jail cell tunnel with the matches, the candle, the rope, and the hammer, speculatively equipped with the items that seem most likely to come in handy.  As it turns out, we can't LIGHT LANTERN until the candle has gone out -- and then we had better do it immediately, or die from a bad fall.

With the lantern lit, we find ourselves in a windy passage now (that is why the candle went out!) with a map and an exit to the west.  The map is A MAP OF SOME TUNNELS.  To the west is a large chamber, and west of that point we are LOST IN MAZE-LIKE PASSAGES, in a location with some moldy bones.

It doesn't seem that this is a traditional adventure maze, however -- the map is still geographically consistent, or at least it is if we're carrying the map.  South of the bones we find a slanted passage heading south to a BRIGHT ROOM with exits north, south, and west.  Traveling south again through a few locations brings us to a KEY.  There's also an outdoor location, outside of the dungeon, west of the bright room, with a sign reading, "RETURN PRINCESS HERE TO WIN."  Oh, yes, the princess -- almost forgot about her!  We've escaped the dungeon, but not our heroic obligations.

The key we found just might work on that locked door near the cave-in... and yes, we can UNLOCK DOOR now.  There's no princess in the OLD DUSTY CHAMBER that greets us, but a large intersection to the south has exits in all four cardinal directions. 

Trying to go south here proves fatal, with no warning, as we slip and fall into a crevice.  I LOAD my previous game, and this time I peek at the BASIC code to learn that I can fix the GO bug by setting F(4) = 1 and continuing; this workaround lets me enter the tunnel I can't otherwise enter after a LOAD and that won't respond to DIG HOLE a second time.  I'm considering this a bug workaround and not a cheat.

Returning to the four-way intersection, I find an empty weapons chamber to the east, and a storage chamber with spiked sneakers to the west.  Ah!  Maybe I need these to keep from slipping and falling.  We can't WEAR SNEAKERS, so I'm relieved to confirm that just having them in inventory helps us travel south of the intersection safely.

And now we encounter... THE DREADED MINOTAUR!  And me with no sword.  Dang it.

Another LOAD and fetch, and we're able to KILL MINOTAUR with the sword in hand, revealing A SMALL OPENING.  And at least we reach the royal chamber!

The princess is ON A CHAIR SCREAMING! 

There's a bed, and a chair, and a mouse!  Man, I wish I had brought that mousetrap...

But I'll try to KILL MOUSE with the sword... YOU MISSED THE MOUSE AND ACCIDENTLY [sic] KILLED THE PRINCESS!!  Oops!  Sorry, hero, your princess is in another phase of existence.

On the next try, I'll bring the mousetrap so I can TRAP MOUSE... nope... DROP TRAP works, though. THE MOUSE GETS CAUGHT IN THE TRAP AND DIES.  So not one of those newfangled live traps, then.  This may explain why the princess is still screaming, but we can just GET PRINCESS, and OK, YOU GOT HER.  She's treated as an inventory item, basically, and we can't TALK PRINCESS or KISS PRINCESS or otherwise put the King Graham-style moves on her, so we'll just have to haul her back outside the dungeon.

We're outside the dungeon now, with the princess, but we haven't been congratulated yet... so I'll DROP PRINCESS... OKAY, I DROPPED IT, as if to emphasize the game's complete lack of development of her character.  And nope, we still have no luck after dumping her unceremoniously outside the dungeon.  Can we SCORE?  We have 0 points.  What the... ?  Ah!  We have to have the princess in our inventory when we type SCORE... and however the game chooses to interpret that verb, now victory is ours!


Steve Sherrard's Dungeon Adventure isn't a bad little game -- there are plenty of rooms to explore, and some suspense and challenge in the endgame, even though the design is a little too specific about certain events like the candle/lantern switchover and the manner of the princess' rescue.  I had fun playing through it, anyway, and it didn't take too long to uncover its secrets.  Onward!

Tuesday, October 14, 2014

Adventure of the Week: An Unexplored Mansion (1983)

I'm working through a more substantial game as I write this, but in the interest of my more-or-less weekly deadline, I'm tackling yet another Rainbow Book of Adventures contest winner -- An Unexplored Mansion, published in 1983 and written by Tim Hanson in BASIC for the TRS-80 Color Computer.


The story casts the player as a young person setting out for the city after growing up in a small town, then nearly hitting a deer and walking for miles to discover an old mansion... unexplored!  The parser is a straightforward two-word affair, with a few unique quirks -- invalid navigational directions just keep us where we are with no specific feedback, and there's no room-level LOOK, as it substitutes for EXAMINE.  INV handles inventory, while I and other unrecognized commands just refresh the current room display.

I can recommend this one to interested readers -- the code is fairly robust, and the puzzles are straightforward but well constructed with useful hints to be found via thorough exploration.  I enjoyed working my way through it in an hour or so, and it made for a pleasant diversion.  So please, feel free to step away and enter An Unexplored Mansion on your own before proceeding with my comprehensive...

***** SPOILERS AHEAD! ***** 


We begin outside, on the front lawn, with the exit to the south (reversing the opening geography of many mansion adventures!) with directions AVALIABLE [sic] to the south, east, and west.

Before entering the house, we'll explore the environs -- to the east is the east garden.  I try to DIG but YOU HURT YOUR HAND with no other result.  To the west side is the rock garden, with a large rock and another exit to the south.  GET ROCK reveals a gun underneath?  Might as well take it along.

Continuing around the house, we find a veranda and another entrance to the mansion to the east.  At the southwest corner of the house is a hilly area with a jagged stone tower visible to the south.  We can obtain some batteries and a skull cap here.  LOOK CAP indicates it's produced by SKINNY BONES HATS FOR SKELETONS INC.

Going south again leads us to the stone tower itself -- the door is locked.  This seems like a good time to examine the objects we've acquired -- the gun is a VERY OLD PISTOL, we have two batteries, and the rock we're lugging around MUST WEIGH AT LEAST FIFTY POUNDS.

There's no SAVE GAME feature available, so there seems to be nothing to do but cross our adventuring fingers and enter the mansion itself.  I'll take the unorthodox approach and enter through the door on the mansion's west side first, since we're over here. 

We find ourselves in a ballroom with a staircase leading up and exits in all four directions.  North is the entrance hall -- and there's nothing nasty lurking there, so it wouldn't have mattered which way we entered the house.  East of the ballroom is the dining hall, with four exits again, so we're going to spend some time mapping this space out.

East of the dining hall is the bathroom, with a sheet of paper that provides instructions for use of... a TIME BOMB?  We have to BUILD BOMB, SET TIMER on the bomb, and escape.  Or somebody does, at least; this sounds suspiciously like a task we'll be taking on, rather than instructions for some other mad bomber.

Going north from the dining hall leads back to the entrance hall, and going south leads to the kitchen.  There's a book of matches here, promoting COLLEGE DEGREES BY MAIL, with a phone number that is notably NOT a fictional 555 exchange -- I wonder what its significance was in 1983?  There is also a dark staircase leading down.

The inventory system is interesting -- when I try to exceed its four item limit as I GET MATCHES, the parser reports, "UGH! YOU NEARLY BROKE MY BACK! BECAUSE YOU FEEL YOU SHOULD GET EVERYTHING YOU SEE YOU HAVE DROPPED EVERYTHING!"  I haven't seen this type of approach before, and it's actually kind of handy during this exploratory stage.

East of the kitchen is a pantry, and we can OPEN CABINET to find a soup can -- it reads CHICKEN NOODLE on the label, but it's empty.  We can try to go D the dark staircase in the kitchen, but IT'S TOO DARK, and when we LIGHT MATCH it BRIEFLY FLARES UP AND DIES.  So we'll need a more enduring light source, it seems.

South of the ballroom is a bar, leading south again to a study -- without the usual clue-filled desk.  West of the study is a library, however, with a very dusty book containing instructions for building a time bomb.  We will need a timing device, a small length of fuse, a small metal container (check!), two batteries (check!), an ounce of gunpowder (the gun?), some electrical wiring, and a match (got it).  The book also mentions that "SOME KNOWLEDGE OF THE USE OF TIMEBOMBS IS DESIRABLE," apparently saving that for a second volume.

So it seems our goal (or at least the only objective that has offered itself so far) is not to find treasure or exorcise an evil spirit or rescue anyone trapped in the mansion, but to blow the place up; kind of a SMALL TOWN BOY MAKES GOOD BOMB story.  So let's head upstairs from the ballroom in search of more bomb components.

The upstairs landing has exits in all four directions.  South is a bedroom, where we can OPEN BUREAU to find a torch, which should be handy.  We can tell IT HAS BEEN USED BEFORE, so it seems it's not a U.K. flashlight but an actual wooden torch.  South of the bedroom is a skeleton closet, containing a skeleton, who is described as KIND OF SKINNY.  Should we do something with the skull cap here?  We can't PUT CAP, but DROP CAP prompts the skeleton to say "THANK YOU VERY MUCH" and drop a fuse at our feet.  We'll just pick it up and not think too much about where that came from.

East of the bedroom is a short hallway with a ladder leading up, and more exits to the north and east.  Climbing up to the attic yields an old wooden box, in which we find a telescope with a label reading, "USE IN A HIGH PLACE."  Probably that rock tower.

East of the short hallway is the upstairs bathroom -- nothing of note here -- and north leads to the guest room, where we find an important item in the form of an old alarm clock.  Traveling west from the short hallway leads us back to the upstairs landing. 

Exploring the western side of the upstairs now, we find an overlook with a view of the rock garden.  USE TELESCOPE here only confirms that YOU AREN'T HIGH ENOUGH.  North of the landing is the master bedroom, where we can GET the oriental RUG to discover the traditional trap door.  We can OPEN DOOR and go down to find a secret room -- a window facing west is coated with grime, too thick to see through, and there's a safe here, though of course we can't just OPEN it.  Examination reveals that it has a COMBONATION [sic] LOCK, and the dial is too rusty to move, so we'll have to... hmmmm... maybe blow it open!

This is probably a good time to learn that we can't leave the secret room the way we came -- the door seems to have disappeared, and we can't BREAK WINDOW or CLEAN WINDOW or MOVE SAFE.  But we can OPEN WINDOW -- it allows us to pop through onto the veranda, then shuts tight again.

So what are still we missing for our bomb construction?  We need a length of fuse and some electrical wiring, and there's a good chance we might find both in the basement.  Oh, wait -- the FUSE the skeleton gave us is actually a very short fuse, not an electrical fuse as I was picturing.  We LIGHT TORCH using the matches, and now we can go down to the cellar.  There's a spool of electrical wire right here, perfect for our needs, and we find a barrel of gunpowder in the arsenal room to the south... I opt not to hang around with my blazing torch, however. 

The wine cellar to the east reveals the source of a strong smell noted when we entered -- a rotting cask of chablis, as well as a monster, who lacks even the courtesy to wait for us to make a move, interrupting our typing with repeated attacks!  With four hits, we're dead, and need to restart.  So we'll need to be quicker about leaving the room, or, presumably, dispatching the creature somehow.

On my second go, I focus on this goal first -- only to find that I can't SHOOT MONSTER and when I cooperate with the parser by trying to KILL MONSTER, the gun isn't loaded.  LOAD GUN reveals that YOU DON'T HAVE EVERYTHING YOU NEED -- and while we have a source of gunpowder, we're short of ammunition.

So we actually have a puzzle here. While exploring some more, I find a small bug -- if we drop the rug anywhere at all, when we GET RUG again we reportedly DISCOVER A HIDDEN DOOR, though it only appears in the master bedroom where it's supposed to.  Maybe we don't need to deal with the monster at all -- we have everything we need to build the bomb now, I think.

Oddly, when we GET GUNPOWDER it doesn't show up in our inventory, but we're not allowed to get more, and the parser thinks we still don't have all the materials needed?  Ah, we have to GET POWDER -- GET GUNPOWDER is confused with the GUN, which I already had in inventory.  BUILD BOMB proves fatal, however, as apparently we were supposed to WIND CLOCK before we do so -- something none of the instructions we've found thought to mention.

As I work my way through a third attempt, something tells me we ought to build the bomb where we plan to detonate it, and since the monster in the wine cellar won't let us hang around long enough to deliver the components, it makes sense to attempt this in the secret room.  We GET CLOCK, WIND CLOCK, BUILD BOMB... whoops, I don't have the matches.  I fetch them, WIND CLOCK again just in case, BUILD BOMB, OPEN WINDOW to escape, and... nothing happens?

Ah -- I forgot to SET TIMER (a separate operation from winding the clock).  This time, I OPEN WINDOW, and on the very next turn: KER-POOOOOWWW!!! THE BOMB GOES OFF!

Fortunately, it was not a big enough bomb to destroy the mansion, just damage the safe in the secret room.  THE DOOR HAS BEEN JARRED LOOSE upon our return, and OPEN SAFE yields a silver lockpick, a note, and a bullet.  The note reads, "LET EVERYBODY KNOW (INCLUDING THE APES) THAT A TREASURE IS HIDDEN, BEHIND ROTTING GRAPES."  So the monster wasn't really the source of the wine cellar's strange odor, it seems.

This seems like a fairly obvious clue given our exploration to date, but before we shoot the monster in the wine cellar, let's check out the tower with our telescope and lockpick.  At the base of the tower we can UNLOCK DOOR with the lockpick, and enter to find a shovel stored here along with a rope ladder leading up.  Climbing to the top, we USE TELESCOPE to read writing carved in a faraway tree: THE KEY TO YOUR SUCCESS IS BURIED IN THE FRONT LAWN.  That will save us a little digging time, anyway, though we probably could have figured this out even if we missed the telescope altogether.

DIGging on the front lawn yields a golden key, so now we're ready to get some more gunpowder, LOAD GUN with the bullet, and KILL MONSTER (typing as fast as we can!)  It only takes one shot to kill the nine-foot tall, fanged, big-footed monster, which is fortunate as we only had the one bullet.  The large drum of chablis here is caked with dust, and when we GET DRUM a small wooden door is revealed.  We OPEN DOOR, and an exit to the north is revealed.

Inside the room north of the wine cellar, we find a LARGE VAULT.  And now all we have to do is UNLOCK VAULT, OPEN VAULT, and find victory and wealth (assuming we're allowed to keep the money and aren't convicted of trespassing on someone's property, breaking, entering, and stealing)!


I enjoyed venturing into An Unexplored Mansion quite a bit -- the puzzles were not difficult, but they were logical and there were a few surprises that forced me to stop and think.  And the descriptions and details were of a higher standard than many of the other games in The Rainbow Book of Adventures.  This was definitely one of the better amateur efforts in this collection, as we get close to wrapping this volume up.

Tuesday, October 7, 2014

Adventure of the Week: The Deed of The York (1983)

This week, we're trying to hunt down The Deed of The York (1983), yet another Rainbow Book of Adventures contest winner, in this case created by Dwight Logan and translated to TRS-80 Color Computer BASIC by Chris Harland.  We're playing using the VCC emulator.


As we might surmise from the title, we're trying to track down the deed to the York Hotel, a family asset hidden by one William T. York, our late, unlamented grandfather, before a rival family faction does.  It's reportedly hidden in his summer home, so it seems we'll be spending our time there rather than going anywhere near the hotel.

Like a lot of the other reader-submitted adventures in The Rainbow's first adventure collection, the format of The Deed of The York comes partly from experimentation, partly from inexperience.  It's not nearly as limited as some of the menu-driven adventures I've recently been covering, but it's not a full-blown adventure engine either.  We're given text descriptions and prompts, and are free to enter whatever we like, but the parser recognizes only a limited set of options in each location and is highly situational, with no inventory system to broaden the possibilities.

This is another one you can safely skip playing -- it's easy enough to explore the world, and the structure is simple enough that death isn't a huge setback.  But actually completing the game depends on sidestepping a frequently fatal bug at the game's conclusion, and I don't generally wish that upon my readers.  So feel free to see what recovering The Deed of The York is all about by venturing directly into the...

***** SPOILERS AHEAD! *****


The game's intro text informs us that THE DOOR WILL ONLY OPEN IF YOU SHOUT 'PIZZA'.  The parser, unusually, asks us to type WHERE to get our bearings rather than LOOK, and its tone is rather snippy -- an initial WHERE at the first prompt yields, YOU'RE OUTSIDE AN OLD HOUSE, STUPID!  And a LOOK, for some reason, causes us to exit the game completely?  Ah -- apparently if we fail to invoke the magic word PIZZA on our first or second turn, the game unceremoniously ends.


Surviving into the entrance hallway, we see a very worn carpet, a coat rack, doors to the right and left and a glass door straight ahead.  LOOK COATRACK reveals the carved initials W.S. -- not William York, apparently.  William Shakespeare?  Will Smith?  MOVE COATRACK and TAKE COATRACK produce the same response as LOOK -- apparently the parser just looks for recognizable keywords in the player's input, so we can save ourselves some typing by sticking to nouns and navigation.

Let's head to the RIGHT and check out the living room -- a couch and two easy chairs are covered in sheets, with a folding door on one wall, a sliding door on another, and a door going left back to the entrance hallway.  Accessing the FOLDING door leads to a dining room with a long oak table and eight chairs, a swinging door, two pictures and a wall switch.  PICTURES moves one of the pictures, yielding a cryptic note: "HE GOT A PIGLET, HE GOT A BIG MAC, BUT WHEN HE LEARED [sic?], HE GOT HISTORICAL."  Is that supposed to be LEARNED or LEERED?  No telling at this point.

Returning to the living room, we move the COUCH to reveal a panel in the wall -- an arrow shoots out, narrowly missing us, with another note: "DON'T MAKE MUCH ADO ABOUT NOTHING."  Another Shakespeare reference?  This action will repeat any time we access the couch -- the game doesn't worry about retaining a memory of events, it seems, so everything kind of happens in the moment.  (And no, I don't think it's going to go all Marcel Proust on us, it seems resolutely focused on Shakes.) The SLIDING door takes us to a den with no other exits, where we spot a TV set -- written in the dust on its top are the words, "BOOKS ARE BETTER!"

Okay -- so far, not much has been learned, or leared, for that matter.  We'll continue exploring the right side of the hall by returning to the dining room north of the living room.  If we touch the TABLE, a trap door unceremoniously dumps us into the basement, and our rivals the Chomiuk family find the deed first, leading to our expulsion from the York family.  I'm not sure I really want to be part of either of these clans, but such is the familial hand we've been dealt.

Re-starting again, we touch the SWITCH on the dining room wall, and LIGHT FILLS THE ROOM every time we do this; there seems to be no way to turn the lights off, nor does there seem to be any reason to want them in either state.  Going through the SWINGING door here leads to a kitchen, with doors left, right and straight ahead.  The CUPBOARD is bare except for a dusty glass, and the ICEBOX contains a roll of paper, reading "SHELVE ALL PLOTS AS THE BARD WAVES HIS JAVELIN."  A double Shakespearean reference here, giving the Prince of Denmark +2 points while the Fresh Prince remains at 0.

Continuing our vaguely northeastern progress, we'll step outside the kitchen to the RIGHT, onto the back porch, where we are explicitly told we should return to the house and nothing else I try produces any interesting responses.  Moving AHEAD from the kitchen is far more dramatic -- A DISEMBODIED ARM SWINGS AN AXE AT YOU!  We stagger through another door, bleeding badly, and take a chance at heading RIGHT -- which leads us outside, to attract help at the hospital, where we can recover and try again (from scratch) another day.  Retrying and going LEFT instead leads us into the central ballroom, where we simply bleed to death.  So we'd best not try to travel north of the kitchen at all, it seems, despite the glimpse of a pantry mentioned before the axe connects.

In our next life, traveling LEFT from the kitchen puts us in the central ballroom -- so apparently we staggered back into the kitchen earlier.  We're always facing north in these rooms, so LEFT is WEST and RIGHT is EAST for traditional mapping purposes.  The ballroom is quite impressive, with a chandelier, a settee, doors to the BEHIND (south), LEFT and RIGHT, a winding staircase leading upstairs, and a green door near the staircase.

There's a music room behind the GREEN door (no, there's no Marilyn Chambers quartet), with a red door, a piano, and portraits of famous English authors and playwrights providing decor.  If we approach the PIANO, unseen fingers play "AS YOU LIKE IT," though trying to look for the portrait of SHAKESPEARE produces nothing interesting.

The music room's RED door leads to the study, with a DESK containing a library card with "1600S" written on it.  A door to the right returns to the music room -- I had my bearings reversed here at first -- and approaching the big FIREPLACE creates a phantasm, a choking hand of ash that drives us back into the ballroom (we can also get there by going through the study's DOUBLE doors.) 

The study's LEFT hand door accesses the library, where we find a shelf of books and a metal panel.  The PANEL leads to a narrow enclosed porch, with a mirror and an old novel lying on a lawn chair.  The MIRROR produces a hummed rendition of "I'M HENRY THE EIGHTH I AM," meant to evoke Shakespeare's work rather than Herman's Hermits, of course, or DJ Jazzy Jeff for that matter.  The NOVEL proves to be a book of blank pages, except for "THIS IS NOT 'A SUMMER'S TALE'" on the first page, and "ALL'S WELL THAT ENDS WELL" on the last, just in case we haven't yet gotten the message.  A DOOR at the rear of the porch takes us back to the entrance hall, through the door on the left that we hadn't explored yet.

Oddly, messing with the SHELF in the library doesn't do anything, despite the apparent hint about shelving the plot.  And I note that some of the geography doesn't quite make sense here -- we go left from the kitchen into the ballroom, and left again from the ballroom to the kitchen.  Touching the SETTEE in the ballroom drops a carved pumpkin on our heads, and we stagger back into the kitchen in a daze before recovering.  Trying to interact with the CHANDELIER causes it to sway away from our attempts.  Curious.  Where have we not been yet?  We can try to go UP from the ballroom -- and a loud wailing noise precedes the appearance of a ghost in white that rushes at us, scaring us out of the house in terror for several days, forfeiting our chance to find the deed.

So... it seems we've explored the accessible house now.  I hadn't yet examined the CARPET in the entrance, which has a label reading, "MADE BY LORD CHAMBERLAIN'S MEN'S SEWING COMPANY-1605," another reference to the Bard's personal history.  We can't use the old library CARD in any direct way, and as I muddle about I eventually provoke an OS ERROR IN 130, as the BASIC program runs out of string memory and forces yet another restart.

What else?  Well, we can pinch our finger in the old lawn CHAIR, to no real effect.  And oh!  It strikes me now that the apparent misspelling LEARED is intentional -- that verse refers to Hamlet (PIGLET), MacBeth (BIG MAC), King LEAR, and Shakespeare's HISTORICAL dramas.

It sure seems like the study or the library might be the place to invoke the Bard and find the deed, but I try SHAKESPEARE and BOOKS and PORTRAITS in both locations to no avail.  And while I'm experimenting in the library some more, I again run into the fatal OS ERROR IN 130 I saw a bit earlier... and that happened here, in the same location... hmmmmmm... maybe we should peek at the code to see what tiny infuriating detail I'm blindly missing... aha!  It's not my approach at fault, for a pleasant change -- this bug's to blame, wherein we'll catch the concept of the game!

All of the unsubtle clues lying around the house are meant to point us toward SHAKESPEARE as our inevitable target, a magic word clearly held as a source of great power by the authors of this adventure.  We've got that much right.  But the game logic doesn't quite work the way the authors intended.  They clearly expect us to enter the library, and immediately say SHAKESPEARE -- which wins the game like so:


Whoops!  Looks like I just told everyone THE SECRETS!

But anyway, here's the technical problem I was running into -- if we hang around the library trying other possibilities, as adventure gamers are wont to do, the routine in line 130, meant to safeguard the magic word from prying eyes, actually causes it to grow with every move.  It's looking for SHAKESPEARE on the first turn we're in the library, but it just keeps adding to the "decrypted" string with each turn.  That is, it starts looking for SHAKESPEARESHAKESPEARE, and then it wants SHAKESPEARESHAKESPEARESHAKESPEARE, and so forth, creating a moving target until it runs out of string memory and produces the game-crashing OS ERROR IN 130.

So the game's offer of victory is good for a very limited time only, and that makes The Deed of The York rather more difficult to complete than it should be!  This is why playtesting is so important -- this is exactly the type of bug that an author never runs into, while almost all players are likely to encounter it.

I have to say, while these old amateur adventure games are often simplistic and buggy, they do come in more varieties than the commercial efforts of the time.  Not everyone had the benefit of reading Scott Adams' seminal article in BYTE magazine during those pre-Internet days, and I'm enjoying seeing how different people starting from scratch chose to implement their own ideas, even if they weren't always completely successful.

(And don't worry, faithful readers -- I'm itching to get back to some more traditional adventuring myself, and will do so before too much longer.)

Tuesday, September 30, 2014

Adventure of the Week: The Door (1983)

I'm continuing to work my way through the 1983 collection known as The Rainbow Book of Adventures, as we find ourselves facing The Door, another BASIC-language contest written by Jean Roseborough for the TRS-80 Color Computer.

 
Unfortunately, despite its initial resemblance to a standard adventure, The Door is really just a guessing game -- so don't bother with this one, gentle reader.  I'm going to jump straight into the...

***** SPOILERS AHEAD! *****

We're initially asked HOW MANY TRIES?, an indirect way of setting the difficulty as the solution is randomized for each run.  I'll try 3, prompting a prescient YOU'LL NEVER MAKE IT! response.

There's only one room here, in which YOU ARE STANDING IN FRONT OF A LARGE DOOR.  The door is, at least, festooned with possible options -- a door knob, a door knocker, a button, and a bell.  I try to backspace at the command prompt so I can take a clean screenshot, and learn that, SORRY, NO MISTAKES ARE ALLOWED IN THIS GAME!  So this parser is going to be a bit of a taskmaster, and in short order I've decided to RI-- no, PU... and suddenly A LOUD EXPLOSION IS HEARD and the game is over.  I hadn't realized the consequences of failure would be quite so dire!

On my next try, I attempt to TURN KNOB, then KNOCK KNOCKER, and PUSH BUTTON -- leading into my third try.  On my fourth, I decide a more generous number of attempts may be in order, and go for 10.  Within three tries under this configuration, as luck would have it, I find that RING BELL works, and victory is ours!


Of course, getting the door to open is not the primary objective here -- the author encourages us to find as many of the 44 possibilities as we can, and it seems the successful choice is randomized each time we start.  We can't do anything mundane like EXAMINE DOOR to get a clue, and there's no INVentory.  Basically, the engine will accept anything we type, and if it matches the randomized solution phrase it has come up with, we win.

The next successful solution I came up with was PUSH DOOR, and after that, figuring out the actual odds of succeeding started to interest me more than the limited gameplay.  As it turns out, our odds aren't all that bad on a strictly probabilistic basis -- 1 in 44 -- though as there's no real parser operating here, we're allowed to make blind guesses using words that the game will never, ever recognize, raising the difficulty considerably.  I was hoping that the game's randomness would be something more like a game of Mastermind -- some tricky, hard-to-predict-but-solvable combination of moves on the door and its accessories that would reveal something new about the puzzle with each unsuccessful choice.  But The Door isn't opening for anything but a single expected phrase, chosen from a set of 44.

Cheating by breaking out and printing the contents of A$(X), at first, then going full-on Twenty One and dumping the successful phrase in the display code on line 5, I learn that some other viable answers are to BREAK DOOR (which I never tried, though I attempted to HIT DOOR and ATTACK DOOR), KNOCK KNOCKER (which I tried many times), GRASP KNOB, BATTER DOOR, RAP KNOCKER, PROD BUTTON, and THUMP KNOCKER.  And while the code checks for some of the traditional Anglo-Saxon curse words and duly admonishes the player with a NOW, NOW, LET'S NOT GET NASTY, it happily allows us to JERK KNOB and LIFT KNOCKER.  Less predictably, we can also CRY, CLAP HANDS, SCREAM, and WHISPER PASSWORD.

Unfortunately, it's not much fun to come up with any of these solutions, because the path to victory remains largely random -- even when we've discovered a solution that can work, its actual success is determined by chance, and unlikely to be the pre-selected answer next time around.  This tends to undermine the learning-by-experience vibe that makes most adventure games entertaining -- here, even if the player eventually discovers, say, ten workable phrases, the odds of one of them being usable in any given run, and hence the odds of the game being winnable at all, remain below 25%.  If we have the source code handy, then sure, 44 moves is always enough to arrive at the right solution.  But it never feels much like adventuring, and so The Door ends up being nothing more than a 44-sided die roll dressed up with a cardboard Dungeon Master.

Tuesday, September 23, 2014

Adventure of the Week: A One Room Adventure (1982)

This week, we're tackling A One Room Adventure, another contest winner from The Rainbow Book of Adventures.  This BASIC-language adventure was written in 1982 by Jorge Mir (who also wrote Dreamer) and published in early 1983, tackling a theme more commonly in recent interactive fiction -- an entire adventure that takes place in a single room.


The premise briefly summed up on the title screen is more explicit about the traditional adventurer's amnesia than the norm; our mission, of course, is to figure out what's going on and escape the room.

I hesitate to recommend A One Room Adventure for general use, only because there are a couple of design limitations (and/or bugs) that make two of the more complex puzzles more difficult to solve than ought to be the case; I had to dig into the code to figure out just what I was missing near the very end of the game.  So feel free to plunge straight into the...


***** SPOILERS AHEAD! *****


We start in the middle of a room, sitting on a chair, blindfolded.  We have nothing in inventory.  I try to ROCK CHAIR -- SORRY, I JUST DON'T KNOW HOW TO ROCK ANYTHING.  Trying to REMOVE BLINDFOLD reveals that, as we might have guessed, MY HANDS ARE TIED WITH A ROPE.  Even so, with a FEEL BLINDFOLD we somehow manage to not feel anything unusual, and we can't WIGGLE EYEBROWS to loosen it.

I try to RUB HANDS to loosen the rope, and receive an unexpected prompt -- ON WHAT?  I try ROPE, but NOTHING HAPPENED.  I try to LEAN OVER, but I DON'T HAVE IT?  GET UP suggests that I CAN'T GET ANYTHING NOW!, and STAND UP indicates that we don't know how to stand anything.  How about SHAKE HEAD?  I DON'T HAVE IT TO SHAKE.  EXAMINE HEAD yields DID ANYBODY MENTION ANYTHING ABOUT ANY HEAD?  So this is one of those parsers that tries to look smarter than it is, by tossing any unrecognized words into a generic handler instead of confessing its dictionary's ignorance.

We can't JUMP or TIP or CHEW or EXAMINE anything, or RUB anything on anything else as far as I can tell, though EXAMINE and RUB seem limited due to the blindfold and not the parser.  So maybe we should work on removing that first.  I try lots of unrecognized phrases, to no avail, and finally I ask for HELP.  This game actually has a help system that accepts objects (BLINDFOLD in this case) and responds with hints, and it lets me know I'm on the wrong track -- we need to work on freeing our hands first.

I can't STRETCH ROPE, or SPREAD HANDS, or CLASP HANDS, or RUB HANDS on HANDS, or MAKE FIST, or SLIP HANDS, or SLIP ROPE, or LOOSEN ROPE.  I try to FEEL POCKET, FEEL PANTS, EXAMINE POCKET -- this, at least, revealing that I DON'T HAVE ANY POCKETS -- and FEEL CHAIR... aha!  I FEEL SOMETHING LIKE A NAIL.  Aha!  RUB ROPE on NAIL tears the rope.  Now we can UNTIE HANDS, UNTIE BLINDFOLD, and see that we are facing the room's north wall.

We see a chair, a desk, and a radio here, and the north wall specification is important -- there are actually four locations within this room that we can visit.  The east wall is near a toolbox, a couch, a big bird cage, and a wood burning stove; the south wall adjoins a door, and we see a switch on the wall, a picture, and a flower pot; and the west wall provides access to a window, some antique furniture, a coat rack, and a coat on the rack.  Most or all of these items will probably be needed if we are going to escape the room, presumably via the door or the window.

Of course, we can't just OPEN the DOOR or the WINDOW.  There are sunflowers growing in the flower pot, and the picture depicts a boat, in a nice wooden frame.  There is, of course, a vault revealed if we GET PICTURE, and opening it will require a combination.

The antique furniture near the west wall turns out to be a bookcase, containing a single notable item peculiar to the era in which this game was written -- IT'S A BOOK ON CB RADIOS.  So the radio must be one of those 1970s relics of Convoy fame.  The book tells us we need power, an antenna, and a microphone to operate the CB set.  The sports coat on the rack can be taken and examined -- EXAMINE POCKET here yields a pair of pliers, generally useful in adventure games.  After we're done checking it out, we can try to PUT COAT - WHERE? - ON RACK - PLEASE, ANSWER WITH ONE WORD - WHERE? - RACK -- but after all that discussion, I CAN'T.  Good thing, though, as if I had I might have missed the wire hanger remaining on the rack -- although my attempts to BEND HANGER and MAKE ANTENNA don't pan out.

Returning to the north wall, we'll check out the desk, which has a large drawer on the side -- locked, naturally.  Near the east wall, some closer examination establishes that the toolbox is rusted shut, the cage contains a white dove, the couch contains some pillows, and the stove is one of those pot-bellied Franklin stoves.  We can OPEN STOVE to find an electric cord, good.  The pillow seems heavy, but we need something to cut it with.

The chair is described as FRAGILE, but the pliers and toolbox are insufficiently heavy to BREAK CHAIR and so is the heavy pillow.  There's a can opener on the couch, now that we've moved the pillow, and at last we've hit the inventory limit -- 8 items, though as the map is so constrained this shouldn't be a big problem.  The birdcage is wired shut, but we can CUT WIRES - WITH WHAT? - PLIERS, then OPEN CAGE to release the dove.  All this establishes is that the cage is now empty, and it's A SPECIAL TYPE DOVE.  A carrier bird, maybe? 

Can we attach the cord to the radio?  One end is bare and the other end has a plug, but I fail in my attempts to ATTACH CORD and FIX RADIO and USE CORD.  Somehow, something I've done (maybe picking up the can opener -- yes, that's it) allows me to OPEN TOOLBOX now, yielding a crowbar, screwdriver, and hammer.  Even the crowbar and hammer seem unable to break the fragile chair, though.

We can TAKE SUNFLOWERS from the pot, and observe that THEY ARE KIND OF DRY.  We don't have any water, but SHAKE SUNFLOWER loosens some seeds, which fall to the floor, attracting a mouse who eats them and flees.  Hmmmm.  This seems like a problem to solve, but I fail in my attempts to somehow shake the seeds into the bird cage in hopes of catching the critter. 

Can we move any of the furniture?  The couch won't budge, but moving the desk reveals an electric outlet.  And I luck into the right verbiage -- we can CONNECT CORD - WHERE? - RADIO and then CONNECT CORD - WHERE? - OUTLET to successfully power the radio.  That helps me figure out that we can CONNECT HANGER - WHERE? - RADIO to create a makeshift antenna as well.  So we just need a microphone now, and we'll pause to take advantage of the game's SAVE command, rare in these magazine type-in adventures -- it even handles both cassette and disk saving.

What else can we try?  Experimentation establishes that the parser recognizes UNSCREW but not SCREW, so we must need the screwdriver for removal rather than assembly.  We can BREAK WINDOW with the crowbar, and the dove flies away.  That might be premature, so I'll re-LOAD my recent save.

I try to EXAMINE FLOOR and notice a small rug and some wire there, along with a familiar blindfold and piece of rope.  MOVE RUG reveals a loose floorboard, as it so often does in these games, and we can... well... EXAMINE BOARD suggests that IT SEEMS TO GIVE A LITTLE, but we can't PULL BOARD at all and can't PUSH BOARD "WITH JUST MY HANDS."  Having the crowbar in hand makes a difference, revealing a round box... but it's empty, and proves unsuitable for catching falling sunflower seeds.

There's a common bug here -- every time we PUSH BOARD, the round box re-materializes under the floorboard, and if it's in our hands the removal isn't counted correctly and we lose an inventory slot.  I'm down to seven usable slots now, and hoping that doesn't break the game. 

Since the floor proved productive, it's not a bad idea to LOOK CEILING -- where we see the dove flying around and nothing else of note.  It seems like it might be a good time to ask for HELP about the RADIO -- and we're encouraged to PLAY RADIO.  We tune in just in time to hear a local news report about a truck stop robbery and a missing driver, presumed kidnapped... it definitely sounds like we may be that person.  We're told that lots of our truck driver friends are driving around looking for us, so there's hope!

So maybe we should break the window, let the dove fly and see what happens.  This also has the effect of adding some glass to the mess on the floor, with which we can CUT PILLOW to reveal a magnifying lens.  Hmmmm... it's a SHERLOCK HOLMES OFFICIAL FAN CLUB LENS.  So we should be able to do some detecting with it.

Can we do anything else with the sunflowers and the mouse?  It's not clear that we can see a mouse hole anywhere at all, but if we try to LOOK HOLE we observe that it LOOKS LIKE IT WAS MADE BY A LARGE RAT.  Can we block it?  The pillow and the rug don't seem to work, nor does the sport coat.  Ahhhh.. the round box is round for a reason, and PUT BOX - WHERE? - HOLE plugs up the rodent traffic, so now we can SHAKE SUNFLOWER and GET SEEDS.  While we're doing this, we see that SOMETHING JUST CAME THROUGH THE BROKEN WINDOW, the returning dove it appears, and with the seeds in hand, we can GET BIRD.

But is there a message?  EXAMINE DOVE doesn't note anything new, and we can't FEEL anything unusual about the bird.  HELP suggests we let it fly away, so let's try that again; it flies through the open window once more.  It won't come to us unless we have some sunflower seeds, which it eats upon arrival, but it doesn't seem to be bringing us any messages, so we must need to arrange an outgoing note.

Can we UNSCREW anything at all?  Not that I can find.  How about OPEN?  We can OPEN RADIO to pop a battery out onto the floor -- shouldn't need that with the power cord connected, though... hmmm... it seems we do?  We'll have to figure that out later.

I try dropping the dove again, and this time it returns with a piece of paper bearing the combination 4R8L12R.  (I did some after-game checking -- the dove only works as expected if we shake out and retrieve another batch of seeds while we have the bird in hand, then drop the bird; it flies away, then immediately returns with the paper tied to its leg, whereas if we don't have seeds when we set it free, it will come back when we get some but without the paper.)  There's no fancy parser wrestling here -- we can now try to OPEN VAULT, respond to the combination prompt with the exact string specified, and obtain a set of keys!  Now we can OPEN DESK and EXAMINE DRAWER to reveal a CB SET!  So I've been wrestling with the wrong radio entirely.

The CB already has a microphone attached, with a button on it upon closer examination.  But nothing happens when we PUSH BUTTON?  Oh, I have to connect the cord and the hanger to the CB rig like I did the radio earlier.  Still nothing?  Can we TURN CB ON?  I TRIED, BUT NOTHING HAPPENED.

There seem to be several bugs at large here -- I had to dig into the code to see that if we've connected the cord to the radio previously, its description changes to IT'S PLUGGED IN and breaks the logic here, so the CB description never changes as we get it into working order.  The big hiccup is that the CB RIG has to be visible in the room in order for it to work at this point, and EXAMINE DRAWER reveals its existence without making it visible the way the code wants it to be.  Closer examination of the internal logic reveals that we have to GET CB out of the drawer before we can actually use it!  This oversight is a bit annoying, because we can do just about everything else -- we can see the CB in the unlocked drawer, connect the cord and the antenna, turn on the power using the switch on the south wall, and see the microphone and its button without touching the rig at all.  But we can't actually PUSH BUTTON to talk until we GET CB and drag it into inventory and either keep it or DROP it into a visible location.  It's one of those cases where what works for the designer doesn't necessarily work for a larger audience that may not behave exactly as the code anticipates.

Now that we can see the CB, we can PUSH BUTTON -- THE CB SWITCHED TO TRANSMIT.  WHAT DO YOU WANT TO SAY?  I'll start with BREAKER BREAKER, which probably doesn't conform to standard CB Radio etiquette but is about all I remember from the CB era.  Fortunately, it doesn't matter what we say at all -- we just have to repeatedly PUSH BUTTON and say something (I AM EURIPIDES!  ALL HAIL MY MARSHMALLOWY GOODNESS!, for example) while our trucker friends try to get a fix on our location.  After a few rounds of this, victory is ours -- well, victory in the form of mild admonishment over getting ourselves into this predicament in the first place:


A One Room Adventure is fairly challenging within its narrow scope, with logical puzzles marred only by strange behavior around the more complex situations.  Without access to the source code I would have been pretty stuck, but I managed to push on through and enjoyed the journey despite a few headaches along the way.  This one hasn't aged well, but it still provided a few interesting hours of adventuring.