
It's been a while... quite a while... nearly two years!
But I had a little free time this week to dive into a nostalgic rabbit hole, and I discovered a few adventure games for the TRS-80 Color Computer that I had seen advertised but never played back in the days when I was an avid CoCo user. Thanks to The Color Computer Archive for keeping these vintage titles accessible!
In this post I'm going to explore 4 Mile Island Adventure, a 1983 release by Owl's Nest Software written in Extended BASIC for Color Computers with at least 16K of RAM. The game operates entirely in memory and was originally available on tape and disk formats. It performs pretty well for a BASIC game, in part because after some initial variable population it handles almost everything with branching logic rather than implementing a "proper" text adventure engine. The presentation mimics the classic Scott Adams style, though it doesn't implement a real location/item "window" at the top of the screen -- text printed below will scroll it off the display like any other output text, with a new room or a LOOK restoring the top section. Another quirk is that I is not treated as INVENTORY, we have to type at least three characters -- all single-character inputs are interpreted as directional commands.
The startup screen confirms the title's implications - our goal is to stop an impending nuclear meltdown:
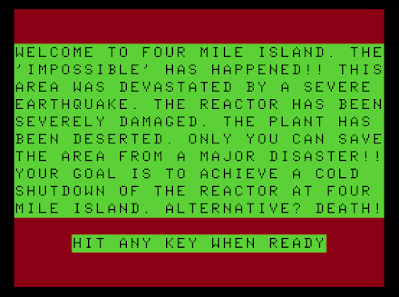
Can we stop it? Maybe, but there are certain to be...
**** SPOILERS AHEAD! ****
We start out at a locked security gate, whose only purpose seems to be to suggest that we've got no way out but to deal with the problem at hand. The map is tightly designed, consisting primarily of two long criss-crossing corridors and a few smaller sub-areas, and I didn't feel the need to draw a map to cope with this pleasantly maze-free experience.
Time is of the essence, measured in turns and temperature -- as we muddle about trying to find a solution, the reactor continues to heat up, and the game ends with a massive meltdown if we are not successful at cooling it down before it hits 750 degrees. It took me a number of unsuccessful tries before I started to find the most efficient path, but in the classic adventure game tradition it is possible to pare out some informational steps on subsequent attempts, and on my final run I had no problem finishing the game well before the meltdown threshold.
Exploring the office area south and east of the security gate, we find a secretary's desk, though it's called a TABLE for the sake of the parser's inability to distinguish this one from another desk to the south. If we LOOK TABLE, we're informed THERE IS A SHEET OF PAPER. READ PAPER yields "ENJOY THE ADVENTURE," so this is an unnecessary task and feels somehow snarky in context.
South of the secretary's desk table we find a BIG DESK (for the big boss?), and LOOK DESK reveals a drawer. We can UNLOCK DRAWER with the key we have in our starting inventory, whether or not we know we have it, so that's not really a factor in the puzzle. OPEN DRAWER produces a useful BADGE, gaining us access to CLASS 'B' CLEARANCE.
There's a securely-locked steel cabinet in an area down an adjoining corridor to the east, but for now we'll focus on the are north of the offices, where having the badge in our possession allows us to travel north of the 'B' SECURITY ROOM to access the REACTOR CONTROL ROOM, core of this adventure.
READ SCREEN here indicates THERE IS NOTHING WRITTEN ON IT, but that's just a parser quirk - LOOK SCREEN gives us critical status information on the state of the reactor, though at this point we don't yet know what the maximum tolerable temperature is.
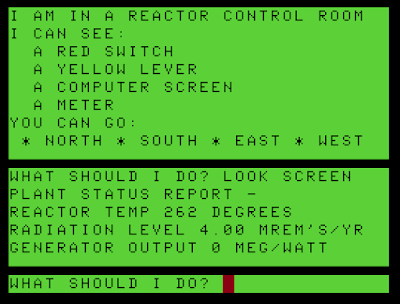
Here's where I got stuck for a bit -- I explored the facility as well as I could, learning I could reset the power breakers in the area east of the control room and observing that the generator to the west started turning after I PULLed the red SWITCH. But I couldn't operate the yellow lever to turn on the pumps, as suggested by READ LEVER: IT SAYS - COOLING PUMPS.
I explored the non-functional Security Station near the offices and tried various unsuccessful commands to open the steel cabinet. Fortunately, this is a BASIC language game, and in examining the code I discovered that, while it is not mentioned onscreen or in the game's single-page manual, we are allowed to LOOK WALL, LOOK FLOOR and LOOK CEILING. (I also discovered that the game is aware of potential player frustration and will chide the player for employing three-letter versions of several popular four-letter words!)
Armed with this new ability, I found a slot in the wall of the control room, and INSERT BADGE opened up a staircase to the lower level. Here I found a crowbar, wrench and rod, although only the crowbar serves a useful purpose -- honestly, I like these kinds of red herrings, because they make the world seem a little more fully realized, as if another character in a different situation would have some options I just didn't need.
LOOK FLOOR in another room reveals a loose tile -- it's too heavy to pick up, but MOVE TILE produces an ID that grants CLASS 'A' CLEARANCE. This allows us to enter the actual nuclear reactor, and while there's some spooky buzzing and a lethal-looking green glow about, the game doesn't track any game-ending cumulative radiation metrics. So we're free to go down to the actual vat area and GET the SPANNER inconveniently stored there. (Incidentally, I'm accustomed to seeing American text adventures with wrenches, and UK games with spanners -- this is a rare occasion where both items exist in the same story, perhaps as a means of humoring the parser.)
We've seen a few valves along the way -- three to be precise -- and armed with these tools, specifically both the crowbar and spanner, we can open the valve to the right of Security 'B' to... dump all the cooling water outside of the plant and end the game with a huge meltdown. So that's not what we want to do.
A valve west of the control room is open and can't be closed. But the third, east of Control, can be, and this opens the cooling valve, though not to any immediate effect.
Returning to the control room, we can PULL SWITCH once to get generator output up to 1 megawatt. A second PULL SWITCH gets to 2 megawatts, and a third sets off an alarm and trips the breakers, which we then have to go reset.
I should pause here to note that it's possible to figure all this out by trial and error, but if we take the crowbar back to the aforementioned steel cabinet, we can PRY CABINET to reveal an OPERATIONS MANUAL, which we can OPEN and READ to learn a few technical details. But it's not strictly necessary, as it contains no passwords or other critical puzzle-solving content. I was fairly successful just messing around with the highly sensitive and dangerous nuclear reactor equipment, so that's a good life lesson to take away from this game. Along with any cancer stimulus we may have picked up inside the highly insecure reactor.
Anyway, with the generator back at 1 megawatt of output (not 2, mind!) we can PULL LEVER to activate the cooling system. A display shows the reactor temperature gradually coming down, line by line, and it's actually a pretty effective suspense technique, counting down as we cross our fingers and hope we didn't miss a puzzle somewhere along the way. Fortunately if we have gotten to this point, victory is ours!

I enjoyed 4 Mile Island Adventure -- it only took two or three hours to complete, and it was a well-constructed little adventure game that managed to get good mileage out of a small map and a few puzzles that seemed fairly obvious but interlocked in interesting, mechanically satisfying ways.
Here's my walkthrough, should anyone want a speedy trip through the game (note that my solution here ignores a lot of discovery details, I was trying to find the most efficient route under the mistaken impression that time was a lot tighter than it really is):
S, E, E, S, S
LOOK DESK
UNLOCK DRAWER
OPEN DRAWER
GET BADGE
N, N, N, N
LOOK WALL
INSERT BADGE
D, W
DROP KEY
GET CROWBAR
E, U, S, E
LOOK FLOOR
MOVE TILE
TAKE ID
W, N, E, N, N
PUSH BREAKER
S
PUSH BREAKER
S, W, N, N
D
GET SPANNER
U, S, S, E
OPEN VALVE
W
PULL SWITCH
PULL LEVER
(And that's the end!)


